jannik2018
Goto Top

Radius server eexterner AP Authentifizierung klappt nicht

Hallo zusammen
Ich hab mir vor kurzem einen Radius server mit mysql Verbindung aufgesetzt und mit meinem tplink Access point verbunden radtest auf lokal klappt allerdings wenn ich mich über den AP ins wlan einloggen möchte klappt es nicht kann jemand helfen?

Content-ID: 503461

Url: https://administrator.de/forum/radius-server-eexterner-ap-authentifizierung-klappt-nicht-503461.html

Ausgedruckt am: 22.12.2024 um 06:12 Uhr

aqui
aqui 11.10.2019 aktualisiert um 12:55:57 Uhr
Goto Top
Der AP authentisiert sich auch nicht, denn der ist ja selber Authenticator. Wenn dann authentisierst du den WLAN Client am AP, was ja auch der Sinn bei WPA Enterprise ist. face-wink

Hier steht genau was du machen musst !
Hast du das alles genau so umgesetzt ???
Sichere 802.1x WLAN-Benutzer Authentisierung über Radius
Hier nochmal im Detail:
Cisco SG 350x Grundkonfiguration
(Die dynamische VLAN Zuweisung kannst du dir wegdenken) Wichtig sind die Debug Outputs des FreeRadius.

Leider ist deine Beschreibung recht oberflächlich was eine zielführende Hilfe verständlicherweise nicht einfach macht face-sad
Ein paar Fragen:
  • Du verwendest vermutlich FreeRadius, richtig ?? WAS sagt der FreeRadius wenn du ihn im Debug Mode mit -X startest ?? (Siehe auch Links oben)
  • Hast du grundsätzlich den Radius mal mit dem NTRadPing Tool: http://www.novell.com/coolsolutions/tools/14377.html getestet ? Wenn ja bekommst du dort ein "Success" ??
  • Im Zweifel um Datenbank Fehler auszuschliessen erstmal mit der lokalen statischen Konfig Datei testen. Was passiert da ??
Um helfen zu können müssen wir logischerweise all diese Dinge wissen und keinen banalen 3 Zeiler um uns den Rest dann zusammenraten zu müssen.... face-sad
Das hilft weder dir noch uns hier in der Community.
Jannik2018
Jannik2018 11.10.2019 aktualisiert um 17:29:20 Uhr
Goto Top
ja ich nutze freeradius richtig datenbank hab ich beim test rausgelassen ich habe es mit dem benutzer aus der config getestet der verbindungsversuch mit NTRadPing Tool war erfolgreich ACCEPT mit diesem user nur wenn ich mit dem AP und den zugangsdaten ins WLAN will lässt er mich nicht rein ip des AP wurde in der clients.conf korrekt hinterlegt auf dem bild sieht man den verbindungversuch im debug mode Mein AP steht auf WPA/WPA2 Enterprise Version WPA2 Encryption Automatic
radiuserror_ap
Jannik2018
Jannik2018 11.10.2019 um 18:37:01 Uhr
Goto Top
und wenn ich im AP VVersion auch auf Automatic stelle erscheint nicht im debug
aqui
aqui 12.10.2019 um 12:06:18 Uhr
Goto Top
Laut Debug Protokoll stimmt irgendwas mit deinem EAP Setup nicht.
Hast du das EAP TLS (eap.conf) entsprechend auf "inner Tunnel" customized ??
Sichere 802.1x WLAN-Benutzer Authentisierung über Radius
https://www.heise.de/select/ct/2019/15/1563187094653417
Jannik2018
Jannik2018 12.10.2019 aktualisiert um 21:53:45 Uhr
Goto Top
was hat der zweite link mit dem thema zu tuhen ? und wo befindet sich die eap.conf ? brauch man bei eap nicht zertifikate auf dem client ?
aqui
aqui 13.10.2019 aktualisiert um 14:24:42 Uhr
Goto Top
Du brauchst nur ein einziges Zertifikat, das ist das Server Zertifikat, damit dir keiner einen alternativen Server unterjubelt. (Siehe Tutorial)
Man kann aber die Zertifikatsprüfung auch deaktivieren im Client wenn man sich des Risikos bewusst ist.
Auch zum Testen macht es ggf. temporär Sinn damit man nicht über die Fussfallen eines falschen oder fehlerhaften Zertifikats stolpert.
(P.S.: Deine Shift Taste scheint defekt zu sein.)
Jannik2018
Jannik2018 13.10.2019 aktualisiert um 18:11:59 Uhr
Goto Top
wie deaktiviert man das ??
aqui
aqui 14.10.2019 um 10:20:47 Uhr
Goto Top
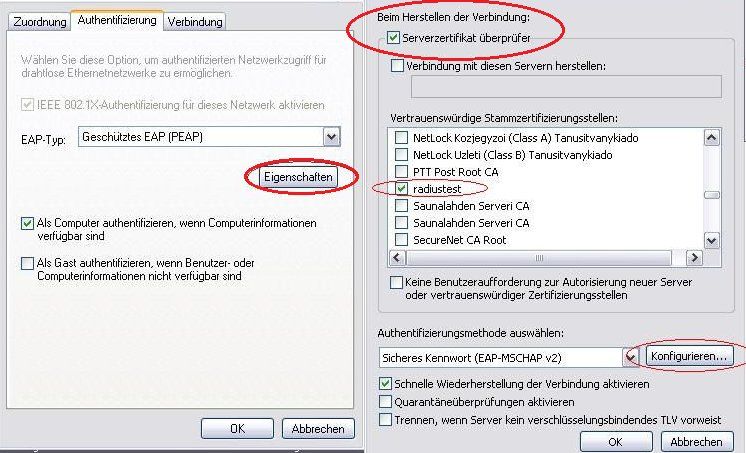
Geht wohl scheinbar bei Win 10 nicht mehr. Früher Win 7 und 8 konnte man in den PEAP Eigenschaften einen entsprechenden Haken entfernen:
zert
Gibts scheinbar nicht mehr oder ist irgendwo anders versteckt: face-sad
zert2
Jannik2018
Jannik2018 14.10.2019 aktualisiert um 13:44:48 Uhr
Goto Top
erstmal muss ich es auf dem server zum laufen bekommen das problem siehe screen ist noch nicht weg scheinbar scheint das mit dem zertifikat wie in der Anleitung beschrieben nicht zu laufen
aqui
aqui 14.10.2019 aktualisiert um 18:25:49 Uhr
Goto Top
Ich mache die Tage mal ein Testsetup mit dem FreeRaidus und einem WLAN AP und poste die Settings.
Es liegt vermutlich daran das du kein PEAP benutzt. Wir werden sehen...
aqui
aqui 15.10.2019 aktualisiert um 18:26:42 Uhr
Goto Top
So, Test erfolgreich wie erwartet. Man muss auch nix groß konfigurieren, der Freeradius ist eine Version 3.0 aus dem Debian Repository.
Sorry für die Länge des Threads aber besser etwas ausführlicher damit es hilft....
Hier sind die Settings im Detail:

back-to-top1.) FreeRadius Client Setup:

#  You can now specify one secret for a network of clients.
#  When a client request comes in, the BEST match is chosen.
#  i.e. The entry from the smallest possible network.
#
client server-network {
        ipaddr          = 192.168.1.0/24
        secret          = testing123
}

client labor-network {
        ipaddr          = 10.0.0.0/8
        secret          = testing123
} 
(Der FreeRadius Server ist selber im Server Netzwerk Segment 192.168.1.0 /24 was hier aber nicht aktiviert sein muss. Relevant ist nur das IP Netz in dem der TP-Link AP liegt. Hier 10.99.1.0 /24.)

back-to-top2.) FreeRadius User Setup:

# Lab Test User
#
test            Cleartext-Password := "geheim"
#
bob             Cleartext-Password := "password"
#
gast            Cleartext-Password := "gast"
Service         Cleartext-Password := "service", Login-Time := "Al1200-2300"
vlan10          Cleartext-Password := "vlan10"
                   Tunnel-Type = 13,
                   Tunnel-Medium-Type = 6,
                   Tunnel-Private-Group-Id = 10
User            Cleartext-Password := "user"
                   Tunnel-Type = 13,
                   Tunnel-Medium-Type = 6,
                   Tunnel-Private-Group-Id = 10

#       Mac Adress Authentication fuer nicht 802.1x Geraete hier !
00123a104123    Cleartext-Password := "00123a104123" 
(Benutztes Login hier im Test = "gast/gast")

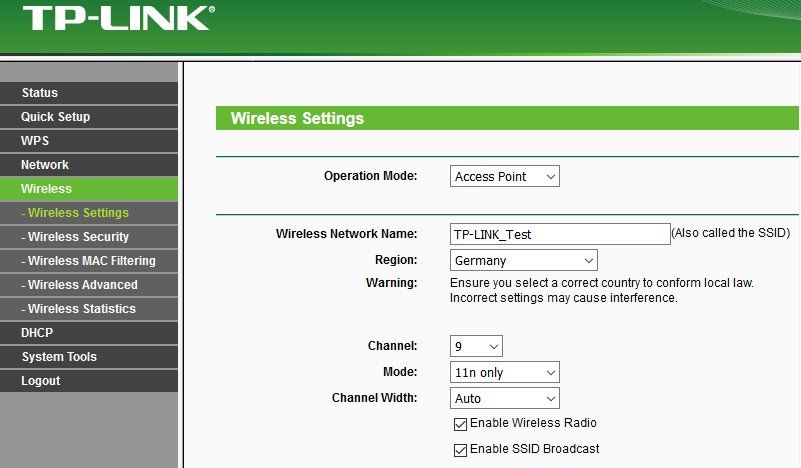
back-to-top3.) TP Link WiFi Setup:

Mehr oder minder selbsterklärend...
tp4

back-to-top4.) TP Link WiFi Security Setup:

Mehr oder minder auch selbsterklärend...
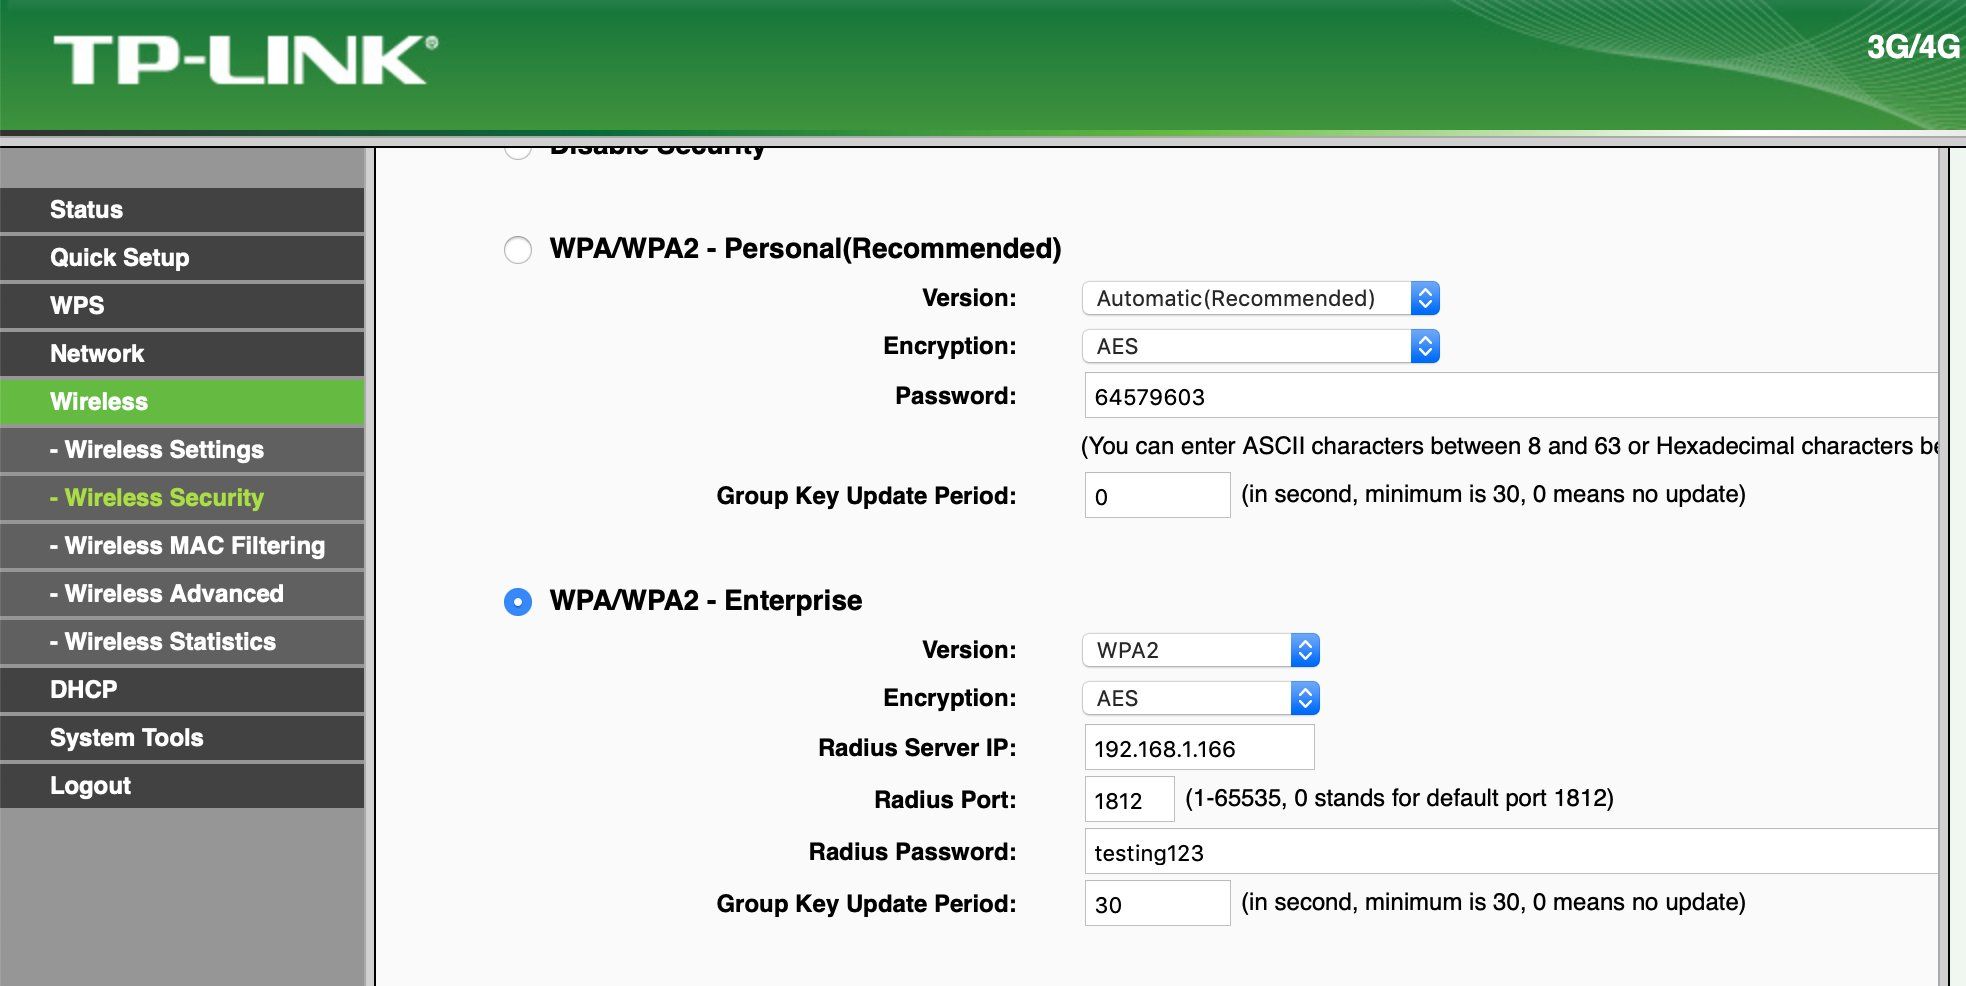
tpneu
Das war dann die Netzwerk Infrastruktur. Bleibt noch der Windows 10 Client:
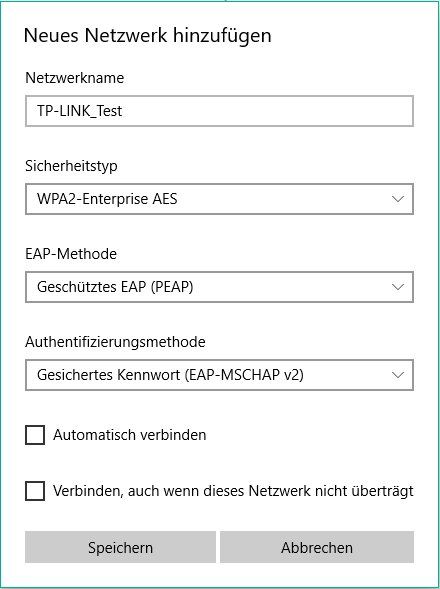
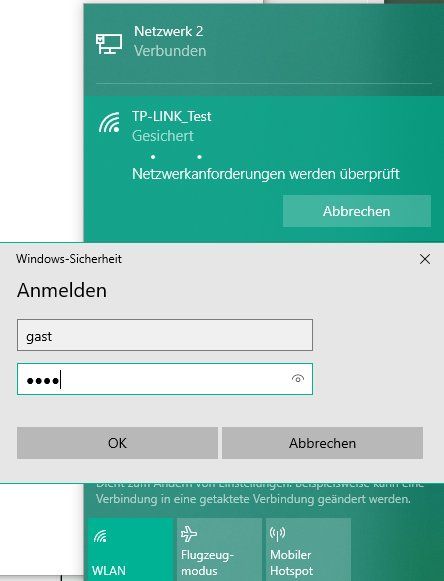
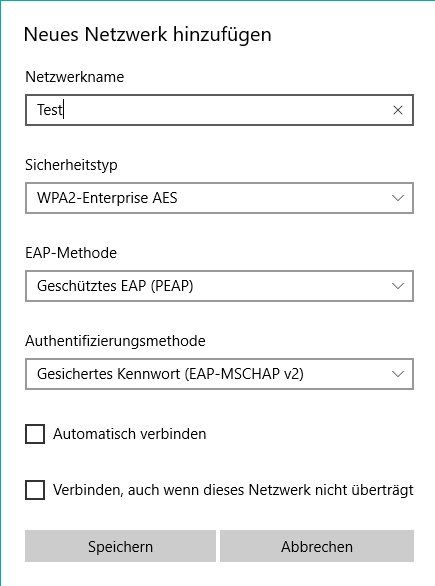
back-to-top5.) Windows 10 WLAN Client Setup:

tp1

back-to-top6.) Windows 10 WLAN Verbindungsaufbau:

tp2
Wenn man möchte kann man sich den Fingerprint des Server Zertifikats ansehen:
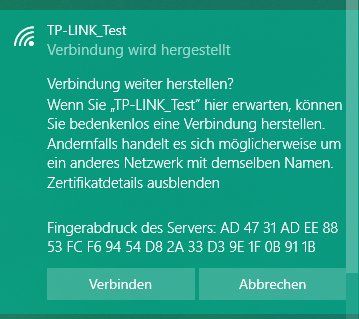
tp5

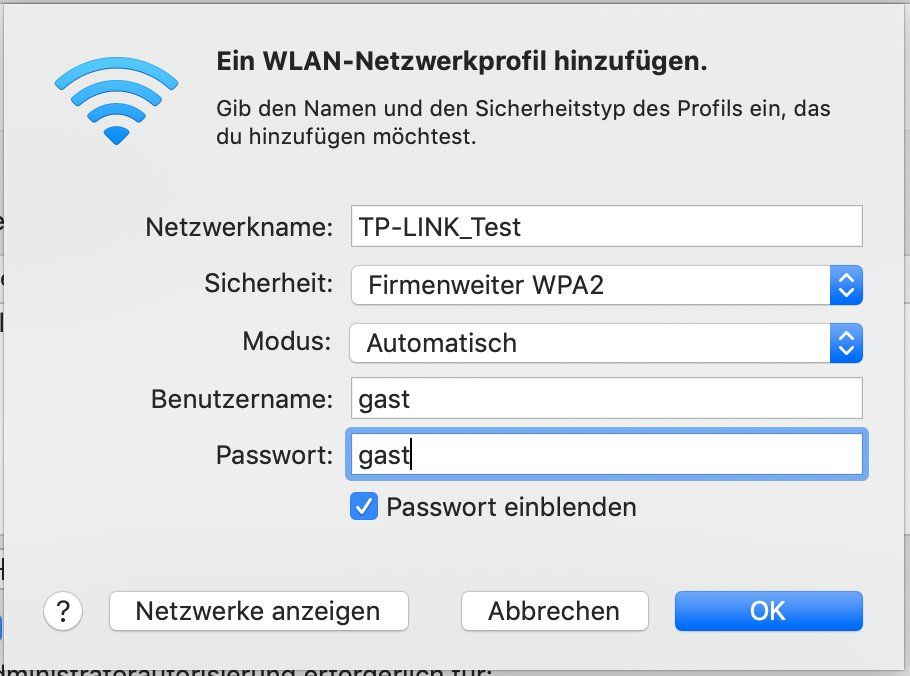
back-to-top6.) Natürlich klappt das auch mit einem Apple Mac Client:

mac2
Und hier die erfolgreiche Verbindung mit dem AP:
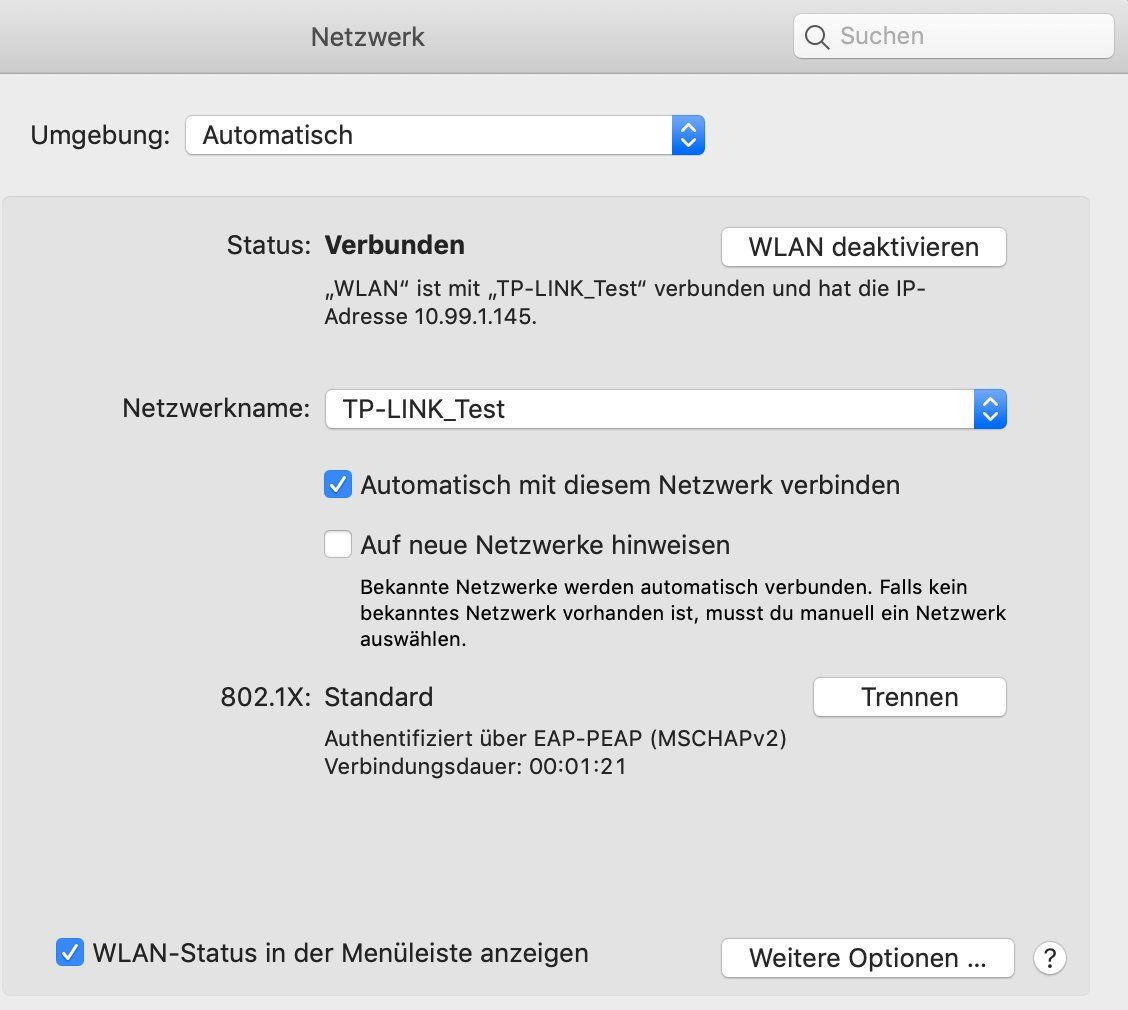
mac1
Jetzt wirds spannend, denn jetzt kommen die Debugging Meldungen des FreeRadius beim Verbinden mit dem WLAN:

back-to-top8.) FreeRadius User Setup:

(15) Received Access-Request Id 51 from 10.99.1.148:45951 to 192.168.1.166:1812 length 207
(15)   User-Name = "gast"
(15)   NAS-IP-Address = 10.99.1.148
(15)   NAS-Port = 0
(15)   Called-Station-Id = "F8-D1-11-A6-E5-54:TP-LINK_Test"
(15)   Calling-Station-Id = "00-22-FB-7B-D8-A6"
(15)   Framed-MTU = 1400
(15)   NAS-Port-Type = Wireless-802.11
(15)   Connect-Info = "CONNECT 0Mbps 802.11"
(15)   EAP-Message = 0x020a002e1900170303002300000000000000045443fba161f13a3801273ffac8f488e5642b767a5e02690c5a169c
(15)   State = 0x374a7b073f406268c3cb420a0d36d7a8
(15)   Message-Authenticator = 0xf314fd80e763f576d8ab0572b827ef65
(15) session-state: No cached attributes
(15) # Executing section authorize from file /etc/freeradius/3.0/sites-enabled/default
(15)   authorize {
(15)     policy filter_username {
(15)       if (&User-Name) {
...
(15)         if (&User-Name =~ /@\./)   -> FALSE
(15)       } # if (&User-Name)  = notfound
(15)     } # policy filter_username = notfound
(15)     [preprocess] = ok
(15)     [chap] = noop
(15)     [mschap] = noop
(15)     [digest] = noop
(15) suffix: Checking for suffix after "@"
(15) suffix: No '@' in User-Name = "gast", looking up realm NULL
(15) suffix: No such realm "NULL"
(15)     [suffix] = noop
(15) eap: Peer sent EAP Response (code 2) ID 10 length 46
(15) eap: Continuing tunnel setup
(15)     [eap] = ok
(15)   } # authorize = ok
(15) Found Auth-Type = eap
(15) # Executing group from file /etc/freeradius/3.0/sites-enabled/default
(15)   authenticate {
(15) eap: Expiring EAP session with state 0x374a7b073f406268
(15) eap: Finished EAP session with state 0x374a7b073f406268
(15) eap: Previous EAP request found for state 0x374a7b073f406268, released from the list
(15) eap: Peer sent packet with method EAP PEAP (25)
(15) eap: Calling submodule eap_peap to process data
(15) eap_peap: Continuing EAP-TLS
(15) eap_peap: [eaptls verify] = ok
(15) eap_peap: Done initial handshake
(15) eap_peap: [eaptls process] = ok
(15) eap_peap: Session established.  Decoding tunneled attributes
(15) eap_peap: PEAP state send tlv success
(15) eap_peap: Received EAP-TLV response
(15) eap_peap: Success
(15) eap: Sending EAP Success (code 3) ID 10 length 4
(15) eap: Freeing handler
(15)     [eap] = ok
(15)   } # authenticate = ok
(15) # Executing section post-auth from file /etc/freeradius/3.0/sites-enabled/default
(15)   post-auth {
(15)     update {
(15)       No attributes updated
(15)     } # update = noop
(15)     [exec] = noop
(15)     policy remove_reply_message_if_eap {
(15)       if (&reply:EAP-Message && &reply:Reply-Message) {
(15)       if (&reply:EAP-Message && &reply:Reply-Message)  -> FALSE
(15)       else {
(15)         [noop] = noop
(15)       } # else = noop
(15)     } # policy remove_reply_message_if_eap = noop
(15)   } # post-auth = noop
(15) Sent Access-Accept Id 51 from 192.168.1.166:1812 to 10.99.1.148:45951 length 0
(15)   MS-MPPE-Recv-Key = 0x5f7345a28aad5a37d6000a9adc2079ab0ef3f868172d2ff30f59fe2a861a392f
(15)   MS-MPPE-Send-Key = 0x694f55058dca04a6599af13218dad2e5d16879778f3969a6dfadee3b180195a3
(15)   EAP-Message = 0x030a0004
(15)   Message-Authenticator = 0x00000000000000000000000000000000
(15)   User-Name = "gast"
(15) Finished request
Waking up in 2.4 seconds.
(6) Cleaning up request packet ID 42 with timestamp +156
Ready to process requests 
Hier kannst du jetzt wunderbar den Ablauf sehen und verfolgen:
  • Received Access-Request from 10.99.1.148:45951 to 192.168.1.166:1812 Eingehender Request vom TP Link AP Absenderport 45951 auf den FreeRadius Zielport 1812.
  • Called-Station-Id = "F8-D1-11-A6-E5-54:TP-LINK_Test": Mac des TP Link AP
  • Calling-Station-Id = "00-22-FB-7B-D8-A6": = Mac des Test Laptop mit Win 10
  • User-Name = "gast": = User Login Name "gast"
  • eap_peap: Session established. Decoding tunneled attributes: = PEAP Session erfolgreich
  • eap_peap: Success: = PEAP Authentisierung OK
  • Sent Access-Accept from 192.168.1.166:1812 to 10.99.1.148:45951: = FreeRadius sendet ein Accept an den TP-Link AP und Windows WLAN Client ist eingebucht im Netz
  • Ready to process requests: = FreeRadius wartet auf die nächste Nutzer Authentisierung.
  • Fertisch...

Das ganze Setup hat ca. 15 Minuten gedauert.
Jannik2018
Jannik2018 16.10.2019 um 22:50:25 Uhr
Goto Top
Vielen Dank erstmal für die ausfürliche Anleitung bitte noch einfügen wie das mit dem Zertifikat auf dem Server gemacht wurde weil es ja genau da bei Mir Klemmt face-smile
aqui
aqui 16.10.2019 aktualisiert um 23:00:54 Uhr
Goto Top
Wie oben schon mehrfach gesagt einfach einmal das Tutorial lesen face-wink
Sichere 802.1x WLAN-Benutzer Authentisierung über Radius
Je nach Distro ist das "certs" Verzeichnis etwas anders gelegen. Es liegt aber immer unterhalb von /etc/freeradius (Debian basierte Distros)
Jannik2018
Jannik2018 16.10.2019 aktualisiert um 23:00:53 Uhr
Goto Top
ja hab ich das funktioniert aber scheinbar irgendwie so nicht bei mir oder ich habe was vergessen deswegen hatte ich nochmal gefragt ich muss ja irgenwie rauskriegen an welcher Stelle es da bei mir klemmt
aqui
aqui 16.10.2019 aktualisiert um 23:03:49 Uhr
Goto Top
Was meckert der FreeRadius Debug denn an bei dir wenn du dich anmeldest am AP ??
Im Zweifel mit apt-purge freeradius das Packet nochmal komplett deinstallieren und neu aufsetzen. Wie gesagt im Grunde muss man eigentlich gar nix machen.
Der Test lief mit dem Default Zertifikat auf einem Orange Pi Zero mit Armbian (Debian).
Jannik2018
Jannik2018 17.10.2019 aktualisiert um 00:36:38 Uhr
Goto Top
hab den debug oben gepostet bei mir leuft es ebenfalls auf Debian
aqui
aqui 17.10.2019 aktualisiert um 17:06:28 Uhr
Goto Top
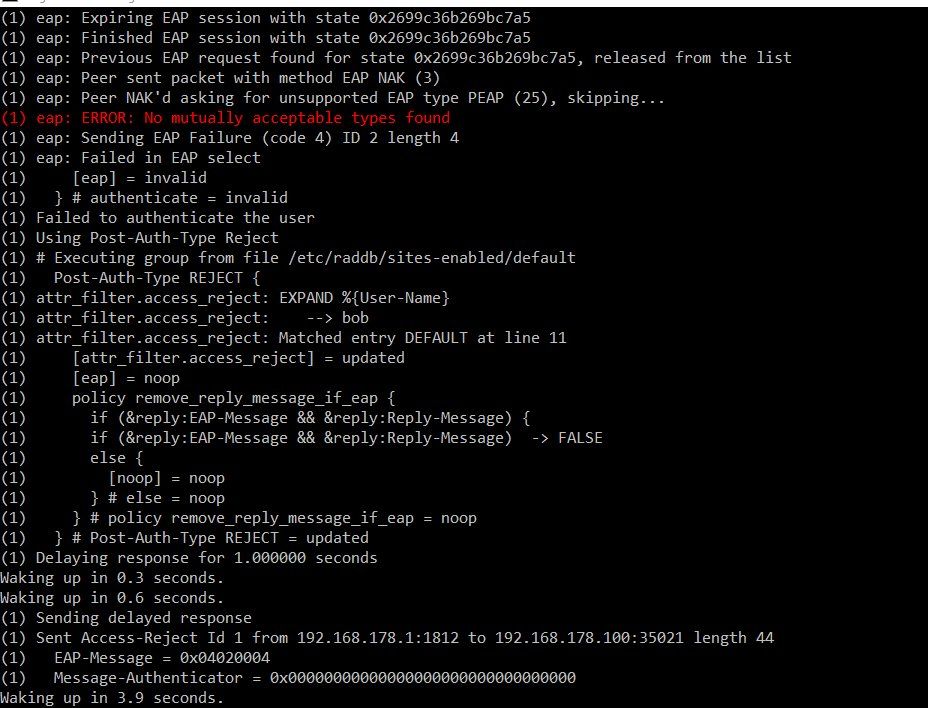
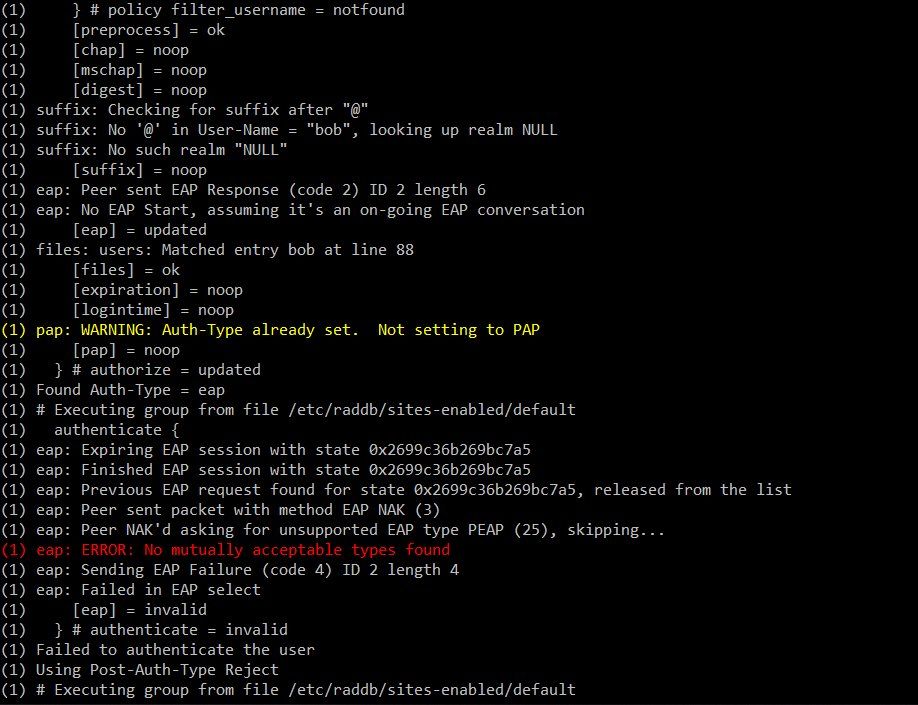
Bei dir stimmt irgendwas mit dem EAP Type nicht !
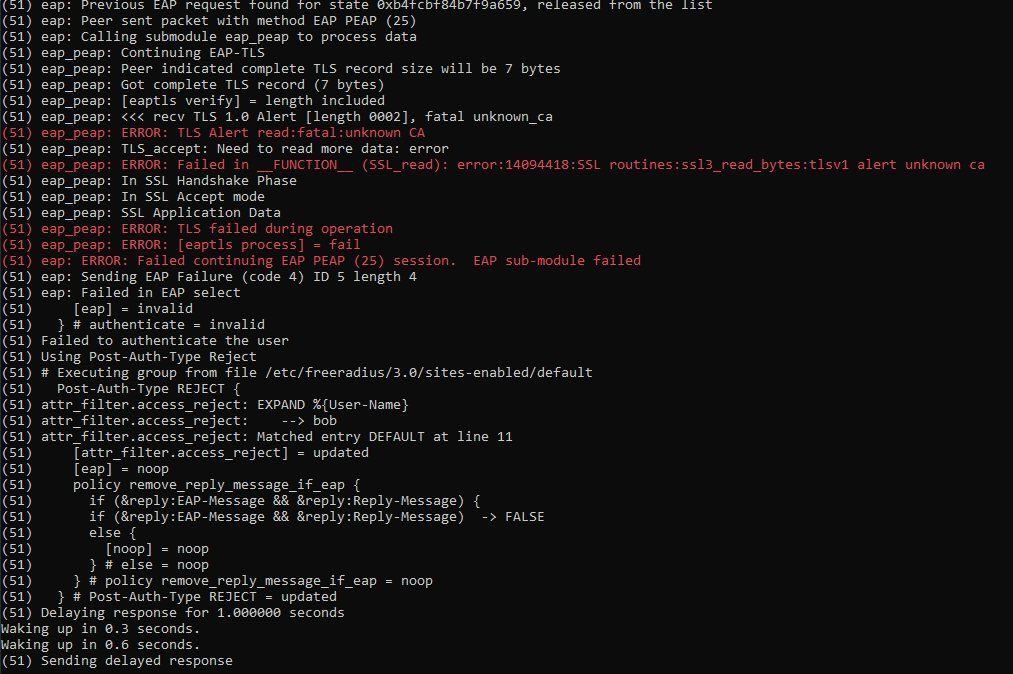
Du kannst ja in deinem Debug sehen das dein TP-Link AP da irgendwelchen komischen EAP Type schickt mit dem der Radius nichts anfangen kann: unsupportet PEAP type (25) Sucht man danach ist in 99% der Fehler das das Root Zertifikat fehlt, was du vermutlich nicht generiert hast auf dem FreeRadius ?!
Eigentlich sollte da ein eap: Peer sent packet with method EAP PEAP kommen !!

Leider fehlt auch dein TP-Link Setup aber an dem oben vom test kannst du ja auch sehen das man da nicht viel anderes konfigurieren kann außer IP und Port. Vermutlich ist das bei dir auch so. Aktuellste Firmware hast du auf deinem TP-Link hoffentlich geflasht ?!
Ich sniffer die TP Link Radius Requests mal mit mit dem Wireshark, dann hast du was zu vergleichen mit deiner TP-Link Kiste was da kommen soll für den FreeRadius !!
Ggf. wirklich mit Purge mal platt machen und neu installieren, Zertifikat generieren, fertisch.

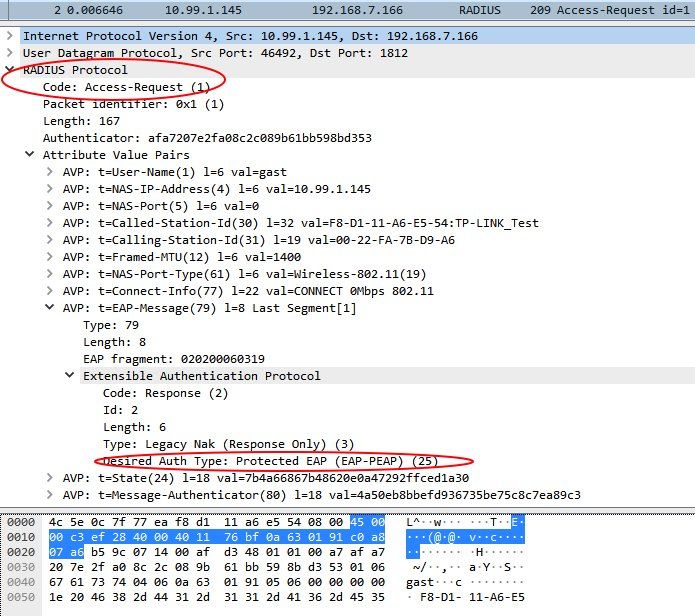
Hier die Wireshark Sniffer Traces:
Radius Request des TP-Link Access Points:
rad2req
Hier sieht man das der desired Request ein PEAP Request ist (25).

Radius Server Antwort auf den Request:
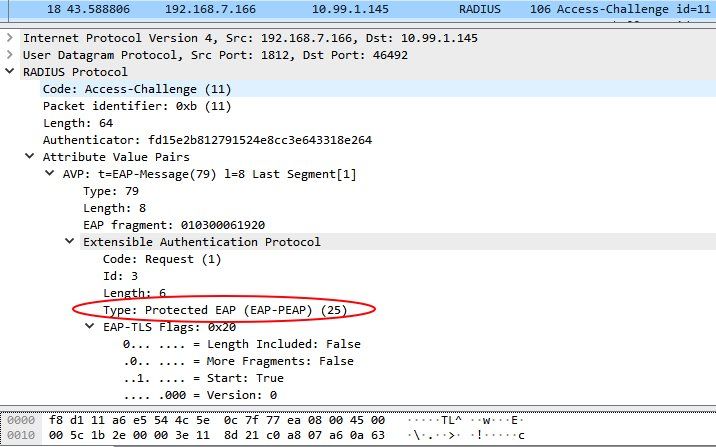
rad1

Alles ganz normal und Standard konform wie es sein soll.
Jannik2018
Jannik2018 17.10.2019 aktualisiert um 15:59:35 Uhr
Goto Top
Ja das Zertifikat fehlt auch weil es so wie beschrieben sich scheinbar bei mir nicht generieren lassen möchte
aqui
aqui 17.10.2019 aktualisiert um 17:36:21 Uhr
Goto Top
Eigentlich komisch und unüblich das es fehlt. Noch komischer das es sich nicht generieren lässt. Das Default Zertifikat erstellt ein simples make im "certs" Verzeichnis. OpenSSL wirst du ja wohl draufhaben auf deinem Server ?!
Kann das sein das bei der Installation was schief gegangen ist ??
So sollte es aussehen:
root@server:/etc/freeradius/3.0/certs# ls -la
total 52
drwxr-xr-x 2 freerad freerad 4096 Apr 19 11:34 .
drwxr-xr-x 9 freerad freerad 4096 Oct  6 15:02 ..
-rw-r----- 1 freerad freerad 2706 Aug 10  2017 bootstrap
-rw-r----- 1 freerad freerad 1432 Aug 10  2017 ca.cnf
-rw-r----- 1 freerad freerad 1103 Aug 10  2017 client.cnf
-rw-r----- 1 freerad freerad  245 Apr 19 11:36 dh
-rw-r----- 1 freerad freerad 4482 Aug 10  2017 Makefile
-rw-r----- 1 freerad freerad 8444 Aug 10  2017 README
-rw-r----- 1 freerad freerad 1125 Aug 10  2017 server.cnf
-rw-r----- 1 freerad freerad  708 Aug 10  2017 xpextensions
root@server:/etc/freeradius/3.0/certs# 
Das ist das Default Zertifikat und auch damit funktioniert es fehlerlos !
http://deployingradius.com/documents/configuration/eap.html
Du musst also zum Testen erstmal keine Produktiv Zertifikate erstellen.
Wenn du sie individuell erstellen willst:
http://deployingradius.com/documents/configuration/certificates.html
Die README Datei im o.a. Verzeichnis hat auch alle Infos zur Generierung. Es reicht ebenso ein einfaches ./bootstrap Das mag aber in anderen Distros ggf. anders sein.
Jannik2018
Jannik2018 17.10.2019 aktualisiert um 19:19:53 Uhr
Goto Top
Er kann mit dem cmd make nichts anfangen
aqui
aqui 17.10.2019 aktualisiert um 19:23:51 Uhr
Goto Top
Hast du mal ein ./make versucht ? Oder du hast die Developer Tools nicht installiert.
Das würde bedeuten das bei dir keine Datei Makefile vorhanden ist ?!
Versuche mal ./bootstrap
Geht aber auch nur wenn die Datei bootstrap im certs Verz. vorhanden ist !
Jannik2018
Jannik2018 17.10.2019 aktualisiert um 23:32:44 Uhr
Goto Top
ja die boostrap datei ist vorhanden
wenn ich ./make sagt er no such file or directory
und bei ./bootstrap erfolgt gar keine ausgabe
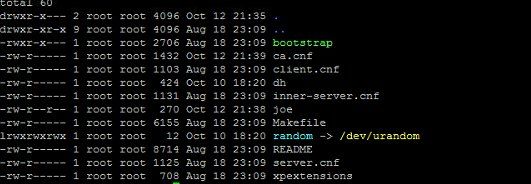
mein cert Verzeichnis
Siehe Screen makefile ist vorhanden
screenshot_11
screenshot_10
aqui
aqui 18.10.2019 aktualisiert um 14:07:13 Uhr
Goto Top
Du hast die Anleitung gelesen, das du mit rm -f *.pem *.der *.csr *.crt *.key *.p12 serial* index.txt* zuerst mal alle alten Keys und Zertifikate löschen musst ?!
Dann ist das certs Verzeichnis so nackig wie oben !

Dann editierst du mit vi oder nano erstmal die ca.cnf und passt die Rubrik [certificate_authority] an:
countryName = DE
stateOrProvinceName = Hessen
localityName = Frankfurt
organizationName = Privat
emailAddress = jannik@example.org
commonName = "Janniks Certificate Authority"


Dann die server.cnf und passt unten die Rubrik [server] an:
[server]
countryName = DE
stateOrProvinceName = Hessen
localityName = Frankfurt
organizationName = Privat
emailAddress = jannik@example.org
commonName = "Janniks Server Certificate"

Analog kannst du das auch im clients.cnf machen unten unter [client].
Beides ist aber NICHT zwingend sondern eher kosmetisch. Du kannst auch die Default Settings drinlassen.
Tip:
In beiden solltest du noch
default_days = 1824
default_crl_days = 912

hochdrehen, damit das Zertifikat 5 Jahre gültig ist. Die Default Settings mit 60 Tagen sind recht kurz face-wink

Dann zuerst die CA erstellen mit make ca.pem und dananch mit make ca.der
Dann das Server Zertifikat mit make server.pem und danach make server.csr
Das sollte es gewesen sein.
Lies dir immer nochmal mit less README die ReadMe Datei durch !! Da steht auch alles drin.
Für PEAP wie oben mit User und Passwort reicht das so. Client Zertifikate brauchst du einzig nur wenn du die WLAN Clients Zertifikatsbasierend behandeln willst was ja erstmal nicht der Fall ist.

Für das Zertifikat ebenfalls wichtig:
Achte darauf das die Uhren im Linux, deinem AP und im Client richtig gehen !! Wenn einer eine falsche Uhrzeit hat kann er die Gültigkeit nicht oder falsch verifizieren. Auch dann scheitert eine Authentisierung.
Du kannst auch sehen das die o.a. Armbian Distro keinerlei generierte Zertifikate hat und die Authentisierung trotzdem fehlerlos rennt.
Das ./bootstrap Script führt der Server beim ersten Start oder Start mit freeradius -X automatisch aus und nutzt dann die Default Test Zertifikate oder eben die erstellten. Deshalb funktionert es auch ganz ohne jegliche Konfig.
Vielleicht versuchst du es auch auch mal ganz ohne mit den Default Test Zertifikaten nachdem du mit rm -f *.pem *.der *.csr *.crt *.key *.p12 serial* index.txt* alle alten Keys und Zerts gelöscht hast und den Server neu gestartet hast. face-wink
Jannik2018
Jannik2018 22.10.2019 aktualisiert um 02:13:41 Uhr
Goto Top
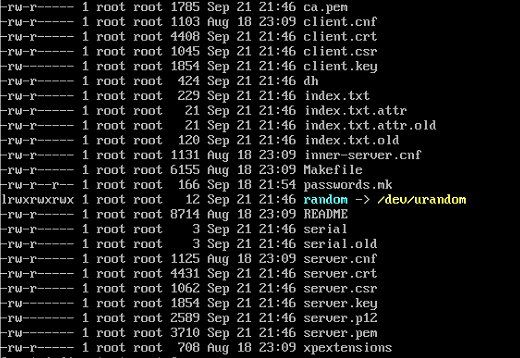
hab jetzt rm Gemacht und den Server neugestartet und jetzt befinden sich folgende dateien in dem certs Ordner ist das so korrekt ??
bei mir ist das client setup komplett auskommentiert (siehe Bild) villeicht ist das schon der fehler mein AP hat die IP 192.168.178.100
rslient
radius2
aqui
aqui 22.10.2019 aktualisiert um 12:24:21 Uhr
Goto Top
ist das so korrekt ??
Das sieht gut aus !
bei mir ist das client setup komplett auskommentiert
Das kann dann logischerweise nicht gehen, denn dann ignoriert der Radius Server komplett alle eingehenden Requests !
Du gibst ihm in der client.conf das IP Netz oder die Hostadresse frei von denen du überhaupt Radius Requests annehmen willst. Ist diese Datei leer ignoriert er alles.
Das musst du natürlich freigeben ! Das steht aber auch mehrfach in ALLEN Tutorials hier und im Internet. Wie kann man sowas übersehen ?! face-wink
villeicht ist das schon der fehler mein AP hat die IP 192.168.178.100
Zu 100% ist er das !
Dort muss dann stehen bei dir:
#  You can now specify one secret for a network of clients.
#  When a client request comes in, the BEST match is chosen.
#  i.e. The entry from the smallest possible network.
#
client server-network {
        ipaddr          = 192.168.178.0/24
        secret          = geheim123
} 
"Secret" ist das Passwort für den Serverzugriff was du individuell setzen solltest.
Danach musst du mit systemctl restart freeradius den Radius neu starten damit der die Settings neu einliest.
Jannik2018
Jannik2018 22.10.2019 um 13:22:12 Uhr
Goto Top
die Anfrage des AP scheint nun zu klappen siehe Screenshot allerdings wenn ich mich Anmelden möchte wird der Zugriff noch Rejektet
screenshot_4
screenshot_6
screenshot_5
aqui
aqui 22.10.2019 aktualisiert um 13:36:26 Uhr
Goto Top
Das sieht fürs erste schon mal gut aus !
  • Wie sieht deine users.conf aus ?? Hast du den User und PW mit dem du dich ins WLAN einloggst dort auch definiert ?
  • Was sagt der Check mit NTRadPing ? Klappt der ?
Bedenklich ist irgendwie das da kein EAP Start kommt.
  • Kann man an deinem TP-Link noch irgendwas einstellen in puncto EAP, PEAP ?
  • Ist die aktuellste Firmware auf dem AP ??
Jannik2018
Jannik2018 22.10.2019 aktualisiert um 13:52:09 Uhr
Goto Top
User ist definiert
der NTRadPing klappt auch
Firmware ist auch aktuell
Kann man an deinem TP-Link noch irgendwas einstellen in puncto EAP, PEAP ?
Hab nichts gefunden
Villeicht liegt es da dran das auf dem AP die Group key Update Period auf 0 steht und bei dir auf 30 ?
aqui
aqui 22.10.2019 um 15:27:33 Uhr
Goto Top
Kann man an deinem TP-Link noch irgendwas einstellen in puncto EAP, PEAP ?
An meinem oben nicht. Siehe Screenshot !
Lediglich die Radius IP, Radius Port und das Passwort was unter clients.conf definiert ist. Das wars...
Mehr muss es eigentlich auch nicht sein. Ist auch überall gleich bei allen APs.
Sniffer den Request bitte mal mit und schicke mal den Content, dann kannst du das mit dem obigen vergleichen !
Dort sollte in jedem Falle Desired Auth Type PEAP (25) drin zu sehen sein !!
Was für ein AP Modell ist das ?
Jannik2018
Jannik2018 22.10.2019 um 15:51:09 Uhr
Goto Top
wie haste das denn gesnifft
aqui
aqui 22.10.2019 um 16:10:58 Uhr
Goto Top
Wireshark ist dein Freund !! https://www.wireshark.org/download.html face-wink
Jannik2018
Jannik2018 22.10.2019 um 16:13:25 Uhr
Goto Top
hab ich ja aber wenn ich nach radíus suche tauchen keine pakete auf
aqui
aqui 22.10.2019 aktualisiert um 16:33:01 Uhr
Goto Top
WO misst du denn ???
Bedenke das du den Sniffer logischerweise im Datenstrom drinhaben musst. Entweder über einen Mirror Port am Switch oder mit einer passiven Probe
https://www.amazon.de/Great-Scott-Gadgets-Throwing-Star/dp/B07GYWZPXG/re ...
oder als Bridge:
https://www.heise.de/ct/artikel/Ethernet-Bridge-als-Sniffer-Quelle-22148 ...

Wenn du den Radius auf einem headless Server hast (RasPi und Co) kannst du das aber auch mit tcpdump machen
tcpdump host 192.168.178.100 -i eth0 -vvv
Zeigt dir die eingehenden Pakete auf deinem Radius Server vom AP mit der .100
Jannik2018
Jannik2018 22.10.2019 um 16:24:18 Uhr
Goto Top
tcpdump syntax error in filter expression sagt er mir
aqui
aqui 22.10.2019 um 16:32:24 Uhr
Goto Top
Ooops... Ahhrgg, Mist war auch ein Dreckfuhler oben in der Syntax, sorry ! (Blank zw. - und i)
Ist korrigiert...
Übrigens... Ein man tcpdump hätte dich das selber erkennen lassen ! face-wink
Jannik2018
Jannik2018 22.10.2019 aktualisiert um 16:39:14 Uhr
Goto Top
hab den fehler
tcpdump -i eth0 -vvv host 192.168.178.100
da war ein leerzeichen deswegen ging es nicht
allerdings taucht immoment noch nichts auf da
aqui
aqui 22.10.2019 um 16:41:13 Uhr
Goto Top
taucht immoment noch nichts auf da
Logisch, denn du musst natürlich erst einen Request triggern indem du dich am WLAN anzumelden versuchst ! face-wink
Das Kommando geht davon aus das die 192.168.178.100 der WLAN AP ist.
Näheres zur tcpdump Syntax auch hier:
https://danielmiessler.com/study/tcpdump/
Jannik2018
Jannik2018 22.10.2019 um 16:43:14 Uhr
Goto Top
ja ist auch der AP dann mache ich jetzt nochmal per client einen Authentifizierungs versuch
aqui
aqui 22.10.2019 um 16:44:46 Uhr
Goto Top
Die Spannung steigt... face-wink
Jannik2018
Jannik2018 22.10.2019 aktualisiert um 16:59:35 Uhr
Goto Top
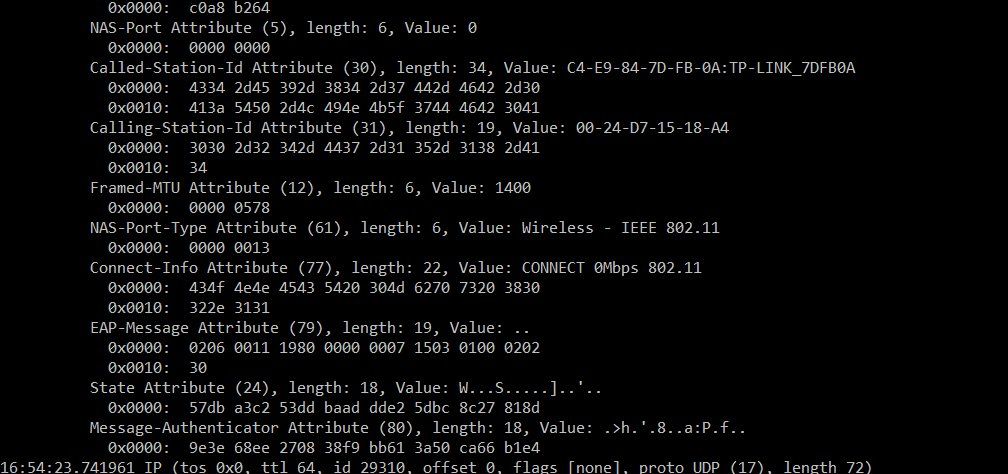
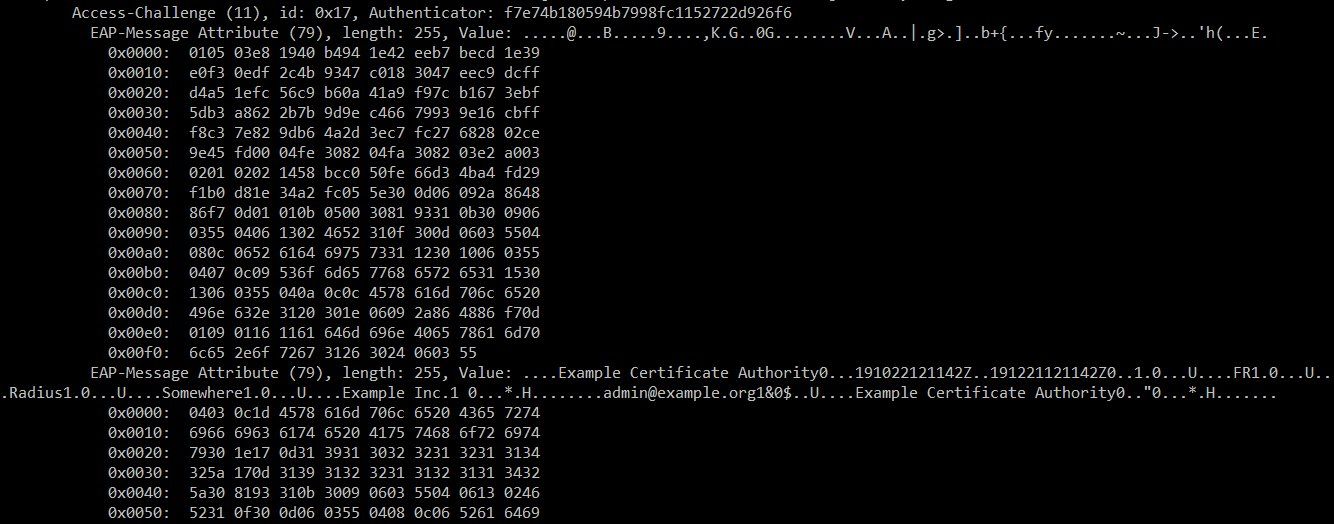
habs was brauchste davon ?
screenshot_10
screenshot_9
aqui
aqui 22.10.2019 aktualisiert um 18:46:59 Uhr
Goto Top
Soweit sieht das nicht falsch aus. Die EAP Attribute 79 und 80 sind auch richtig: Siehe hier:
https://freeradius.org/rfc/rfc2869.html
Kapitel EAP.

Du müsstest mal deine eap.conf checken und vergleichen was dort in der Sektion "EAP" und PEAP" konfiguriert ist.
Dieser PAP Error gehört da definitiv nicht hin bei dir.
So sieht der PEAP Abschnitt in der hiesigen eap Konfig Datei aus:
        #
        peap {
                #  Which tls-config section the TLS negotiation parameters
                #  are in - see EAP-TLS above for an explanation.
                #
                #  In the case that an old configuration from FreeRADIUS
                #  v2.x is being used, all the options of the tls-config
                #  section may also appear instead in the 'tls' section
                #  above. If that is done, the tls= option here (and in
                #  tls above) MUST be commented out.
                #
                tls = tls-common

                #  The tunneled EAP session needs a default
                #  EAP type which is separate from the one for
                #  the non-tunneled EAP module.  Inside of the
                #  PEAP tunnel, we recommend using MS-CHAPv2,
                #  as that is the default type supported by
                #  Windows clients.
                #
                default_eap_type = mschapv2

                #  The PEAP module also has these configuration
                #  items, which are the same as for TTLS.
                #
                copy_request_to_tunnel = no

                #
                #  As of version 3.0.5, this configuration item
                #  is deprecated.  Instead, you should use
                #
                #       update outer.session-state {
                #               ...
                #
                #       }
                #
                #  This will cache attributes for the final Access-Accept.
                #
                use_tunneled_reply = no

                #  When the tunneled session is proxied, the
                #  home server may not understand EAP-MSCHAP-V2.
                #  Set this entry to "no" to proxy the tunneled
                #  EAP-MSCHAP-V2 as normal MSCHAPv2.
                #
        #       proxy_tunneled_request_as_eap = yes

                #
                #  The inner tunneled request can be sent
                #  through a virtual server constructed
                #  specifically for this purpose.
                #
                #  If this entry is commented out, the inner
                #  tunneled request will be sent through
                #  the virtual server that processed the
                #  outer requests.
                #
                virtual_server = "inner-tunnel"

                # This option enables support for MS-SoH
                # see doc/SoH.txt for more info.
                # It is disabled by default.
                #
        #       soh = yes

                #
                # The SoH reply will be turned into a request which
                # can be sent to a specific virtual server:
                #
        #       soh_virtual_server = "soh-server"

                #
                # Unlike EAP-TLS, PEAP does not require a client certificate.
                # However, you can require one by setting the following
                # option. You can also override this option by setting
                #
                #       EAP-TLS-Require-Client-Cert = Yes
                #
                # in the control items for a request.
                #
        #       require_client_cert = yes
        }

        #
        #  This takes no configuration.
        #
        #  Note that it is the EAP MS-CHAPv2 sub-module, not
        #  the main 'mschap' module.
        #
        #  Note also that in order for this sub-module to work,
        #  the main 'mschap' module MUST ALSO be configured.
        #
        #  This module is the *Microsoft* implementation of MS-CHAPv2
        #  in EAP.  There is another (incompatible) implementation
        #  of MS-CHAPv2 in EAP by Cisco, which FreeRADIUS does not
        #  currently support.
        #
        mschapv2 {
                #  Prior to version 2.1.11, the module never
                #  sent the MS-CHAP-Error message to the
                #  client.  This worked, but it had issues
                #  when the cached password was wrong.  The
                #  server *should* send "E=691 R=0" to the
                #  client, which tells it to prompt the user
                #  for a new password.
                #
                #  The default is to behave as in 2.1.10 and
                #  earlier, which is known to work.  If you
                #  set "send_error = yes", then the error
                #  message will be sent back to the client.
                #  This *may* help some clients work better,
                #  but *may* also cause other clients to stop
                #  working.
                #
#               send_error = no

                #  Server identifier to send back in the challenge.
                #  This should generally be the host name of the
                #  RADIUS server.  Or, some information to uniquely
                #  identify it.
#               identity = "FreeRADIUS"
        } 
Jannik2018
Jannik2018 22.10.2019, aktualisiert am 24.10.2019 um 12:58:27 Uhr
Goto Top
Meine EAP Conf
# -*- text -*-
##
##  eap.conf -- Configuration for EAP types (PEAP, TTLS, etc.)
##
##      $Id: 36849e10f284fa34d43fd0d31358dd2699758625 $

#######################################################################
#
#  Whatever you do, do NOT set 'Auth-Type := EAP'.  The server  
#  is smart enough
#
eap {
        #  Invoke the default supported EAP type when
        #  EAP-Identity response is received.
        #
        #  The incoming EAP messages DO NOT specify which EAP
        #  type they will be using, so it MUST be set here.
        #
        #  For now, only one default EAP type may be used at a time.
        #
        #  If the EAP-Type attribute is set by another module,
        #  then that EAP type takes precedence over the
        #  default type configured here.
        #
        default_eap_type = md5

        #  A list is maintained to correlate EAP-Response
        #  packets with EAP-Request packets.  After a
        #  configurable length of time, entries in the list
        #  expire, and are deleted.
        #
        timer_expire = 60

        #  There are many EAP types, but the server has support
        #  for only a limited subset.  If the server receives
        #  a request for an EAP type it does not support, then
        #  it normally rejects the request.  By setting this
        #  configuration to "yes", you can tell the server to  
        #  instead keep processing the request.  Another module
        #  MUST then be configured to proxy the request to
        #  another RADIUS server which supports that EAP type.
        #
        #  If another module is NOT configured to handle the
        #  request, then the request will still end up being
        #  rejected.
        #
        ignore_unknown_eap_types = no

        # Cisco AP1230B firmware 12.2(13)JA1 has a bug.  When given
        # a User-Name attribute in an Access-Accept, it copies one
        # more byte than it should.
        #
        # We can work around it by configurably adding an extra
        # zero byte.
        #
        cisco_accounting_username_bug = no

        #  Help prevent DoS attacks by limiting the number of
        #  sessions that the server is tracking.  For simplicity,
        #  this is taken from the "max_requests" directive in  
        #  radiusd.conf.
        #
        max_sessions = ${max_requests}


        ############################################################
        #
        #  Supported EAP-types
        #


        #  EAP-MD5
        #
        #  We do NOT recommend using EAP-MD5 authentication
        #  for wireless connections.  It is insecure, and does
        #  not provide for dynamic WEP keys.
        #
        md5 {
        }


        #  EAP-pwd -- secure password-based authentication
        #
        #pwd {
        #       group = 19

        #       server_id = theserver@example.com

                #  This has the same meaning as for TLS.
                #
        #       fragment_size = 1020

                # The virtual server which determines the
                # "known good" password for the user.  
                # Note that unlike TLS, only the "authorize"  
                # section is processed.  EAP-PWD requests can be
                # distinguished by having a User-Name, but
                # no User-Password, CHAP-Password, EAP-Message, etc.
                #
        #       virtual_server = "inner-tunnel"  
        #}


        #  Cisco LEAP
        #
        #  We do not recommend using LEAP in new deployments.  See:
        #  http://www.securiteam.com/tools/5TP012ACKE.html
        #
        #  Cisco LEAP uses the MS-CHAP algorithm (but not
        #  the MS-CHAP attributes) to perform it's authentication.  
        #
        #  As a result, LEAP *requires* access to the plain-text
        #  User-Password, or the NT-Password attributes.
        #  'System' authentication is impossible with LEAP.  
        #
        leap {
        }


        #  EAP-GTC -- Generic Token Card
        #
        #  Currently, this is only permitted inside of EAP-TTLS,
        #  or EAP-PEAP.  The module "challenges" the user with  
        #  text, and the response from the user is taken to be
        #  the User-Password.
        #
        #  Proxying the tunneled EAP-GTC session is a bad idea,
        #  the users password will go over the wire in plain-text,
        #  for anyone to see.
        #
        gtc {
                #  The default challenge, which many clients
                #  ignore..
                #
        #       challenge = "Password: "  

                #  The plain-text response which comes back
                #  is put into a User-Password attribute,
                #  and passed to another module for
                #  authentication.  This allows the EAP-GTC
                #  response to be checked against plain-text,
                #  or crypt'd passwords.  
                #
                #  If you say "Local" instead of "PAP", then  
                #  the module will look for a User-Password
                #  configured for the request, and do the
                #  authentication itself.
                #
                auth_type = PAP
        }


        #  Common TLS configuration for TLS-based EAP types
        #  ------------------------------------------------
        #
        #  See raddb/certs/README for additional comments
        #  on certificates.
        #
        #  If OpenSSL was not found at the time the server was
        #  built, the "tls", "ttls", and "peap" sections will  
        #  be ignored.
        #
        #  If you do not currently have certificates signed by
        #  a trusted CA you may use the 'snakeoil' certificates.  
        #  Included with the server in raddb/certs.
        #
        #  If these certificates have not been auto-generated:
        #    cd raddb/certs
        #    make
        #
        #  These test certificates SHOULD NOT be used in a normal
        #  deployment.  They are created only to make it easier
        #  to install the server, and to perform some simple
        #  tests with EAP-TLS, TTLS, or PEAP.
        #
        #  Note that you should NOT use a globally known CA here!
        #  e.g. using a Verisign cert as a "known CA" means that  
        #  ANYONE who has a certificate signed by them can
        #  authenticate via EAP-TLS!  This is likely not what you want.
        #
        tls-config tls-common {
                private_key_password = whatever
                private_key_file = ${certdir}/server.pem

                #  If Private key & Certificate are located in
                #  the same file, then private_key_file &
                #  certificate_file must contain the same file
                #  name.
                #
                #  If ca_file (below) is not used, then the
                #  certificate_file below SHOULD also include all of
                #  the intermediate CA certificates used to sign the
                #  server certificate, but NOT the root CA.
                #
                #  Including the ROOT CA certificate is not useful and
                #  merely inflates the exchanged data volume during
                #  the TLS negotiation.
                #
                #  This file should contain the server certificate,
                #  followed by intermediate certificates, in order.
                #  i.e. If we have a server certificate signed by CA1,
                #  which is signed by CA2, which is signed by a root
                #  CA, then the "certificate_file" should contain  
                #  server.pem, followed by CA1.pem, followed by
                #  CA2.pem.
                #
                #  When using "ca_file" or "ca_dir", the  
                #  "certificate_file" should contain only  
                #  "server.pem".  And then you may (or may not) need  
                #  to set "auto_chain", depending on your version of  
                #  OpenSSL.
                #
                #  In short, SSL / TLS certificates are complex.
                #  There are many versions of software, each of which
                #  behave slightly differently.  It is impossible to
                #  give advice which will work everywhere.  Instead,
                #  we give general guidelines.
                #
                certificate_file = ${certdir}/server.pem

                #  Trusted Root CA list
                #
                #  This file can contain multiple CA certificates.
                #  ALL of the CA's in this list will be trusted to  
                #  issue client certificates for authentication.
                #
                #  In general, you should use self-signed
                #  certificates for 802.1x (EAP) authentication.
                #  In that case, this CA file should contain
                #  *one* CA certificate.
                #
                ca_file = ${cadir}/ca.pem

                #  OpenSSL will automatically create certificate chains,
                #  unless we tell it to not do that.  The problem is that
                #  it sometimes gets the chains right from a certificate
                #  signature view, but wrong from the clients view.
                #
                #  When setting "auto_chain = no", the server certificate  
                #  file MUST include the full certificate chain.
                #
        #       auto_chain = yes

                #  If OpenSSL supports TLS-PSK, then we can use a
                #  fixed PSK identity and (hex) password.  As of
                #  3.0.18, these can be used at the same time as the
                #  certificate configuration, but only for TLS 1.0
                #  through 1.2.
                #
                #  If PSK and certificates are configured at the same
                #  time for TLS 1.3, then the server will warn you,
                #  and will disable TLS 1.3, as it will not work.
                #
                #  The work around is to have two modules (or for
                #  RadSec, two listen sections).  One will have PSK
                #  configured, and the other will have certificates
                #  configured.
                #
        #       psk_identity = "test"  
        #       psk_hexphrase = "036363823"  

                #  Dynamic queries for the PSK.  If TLS-PSK is used,
                #  and psk_query is set, then you MUST NOT use
                #  psk_identity or psk_hexphrase.
                #
                #  Instead, use a dynamic expansion similar to the one
                #  below.  It keys off of TLS-PSK-Identity.  It should
                #  return a of string no more than 512 hex characters.
                #  That string will be converted to binary, and will
                #  be used as the dynamic PSK hexphrase.
                #
                #  Note that this query is just an example.  You will
                #  need to customize it for your installation.
                #
        #       psk_query = "%{sql:select hex(key) from psk_keys where keyid = '                                                                                                                                                             %{TLS-PSK-Identity}'}"  

                #  For DH cipher suites to work, you have to
                #  run OpenSSL to create the DH file first:
                #
                #    openssl dhparam -out certs/dh 2048
                #
                dh_file = ${certdir}/dh

                #  If your system doesn't have /dev/urandom,  
                #  you will need to create this file, and
                #  periodically change its contents.
                #
                #  For security reasons, FreeRADIUS doesn't  
                #  write to files in its configuration
                #  directory.
                #
        #       random_file = /dev/urandom

                #  This can never exceed the size of a RADIUS
                #  packet (4096 bytes), and is preferably half
                #  that, to accommodate other attributes in
                #  RADIUS packet.  On most APs the MAX packet
                #  length is configured between 1500 - 1600
                #  In these cases, fragment size should be
                #  1024 or less.
                #
        #       fragment_size = 1024

                #  include_length is a flag which is
                #  by default set to yes If set to
                #  yes, Total Length of the message is
                #  included in EVERY packet we send.
                #  If set to no, Total Length of the
                #  message is included ONLY in the
                #  First packet of a fragment series.
                #
        #       include_length = yes


                #  Check the Certificate Revocation List
                #
                #  1) Copy CA certificates and CRLs to same directory.
                #  2) Execute 'c_rehash <CA certs&CRLs Directory>'.  
                #     'c_rehash' is OpenSSL's command.  
                #  3) uncomment the lines below.
                #  5) Restart radiusd
        #       check_crl = yes

                # Check if intermediate CAs have been revoked.
        #       check_all_crl = yes

                ca_path = ${cadir}

                # Accept an expired Certificate Revocation List
                #
        #       allow_expired_crl = no

                #  If check_cert_issuer is set, the value will
                #  be checked against the DN of the issuer in
                #  the client certificate.  If the values do not
                #  match, the certificate verification will fail,
                #  rejecting the user.
                #
                #  This check can be done more generally by checking
                #  the value of the TLS-Client-Cert-Issuer attribute.
                #  This check can be done via any mechanism you
                #  choose.
                #
        #       check_cert_issuer = "/C=GB/ST=Berkshire/L=Newbury/O=My Company L                                                                                                                                                             td"  

                #  If check_cert_cn is set, the value will
                #  be xlat'ed and checked against the CN  
                #  in the client certificate.  If the values
                #  do not match, the certificate verification
                #  will fail rejecting the user.
                #
                #  This check is done only if the previous
                #  "check_cert_issuer" is not set, or if  
                #  the check succeeds.
                #
                #  In 2.1.10 and later, this check can be done
                #  more generally by checking the value of the
                #  TLS-Client-Cert-Common-Name attribute.  This check
                #  can be done via any mechanism you choose.
                #
        #       check_cert_cn = %{User-Name}

                #  Set this option to specify the allowed
                #  TLS cipher suites.  The format is listed
                #  in "man 1 ciphers".  
                #
                #  For EAP-FAST, use "ALL:!EXPORT:!eNULL:!SSLv2"  
                #
                cipher_list = "DEFAULT"  

                #  If enabled, OpenSSL will use server cipher list
                #  (possibly defined by cipher_list option above)
                #  for choosing right cipher suite rather than
                #  using client-specified list which is OpenSSl default
                #  behavior.  Setting this to "yes" means that OpenSSL  
                #  will choose the servers ciphers, even if they do not
                #  best match what the client sends.
                #
                #  TLS negotiation is usually good, but can be imperfect.
                #  This setting allows administrators to "fine tune" it  
                #  if necessary.
                #
                cipher_server_preference = no

                #  You can selectively disable TLS versions for
                #  compatability with old client devices.
                #
                #  If your system has OpenSSL 1.1.0 or greater, do NOT
                #  use these.  Instead, set tls_min_version and
                #  tls_max_version.
                #
        #       disable_tlsv1_2 = no
        #       disable_tlsv1_1 = no
        #       disable_tlsv1 = no

                #  Set min / max TLS version.  Mainly for Debian
                #  "trusty", which disables older versions of TLS, and  
                #  requires the application to manually enable them.
                #
                #  If you are running Debian trusty, you should set
                #  these options, otherwise older clients will not be
                #  able to connect.
                #
                #  Allowed values are "1.0", "1.1", and "1.2".  
                #
                #  The values must be in quotes.
                #
        #       tls_min_version = "1.0"  
        #       tls_max_version = "1.2"  

                #  Elliptical cryptography configuration
                #
                #  Only for OpenSSL >= 0.9.8.f
                #
                ecdh_curve = "prime256v1"  

                #  Session resumption / fast reauthentication
                #  cache.
                #
                #  The cache contains the following information:
                #
                #   session Id - unique identifier, managed by SSL
                #   User-Name  - from the Access-Accept
                #   Stripped-User-Name - from the Access-Request
                #   Cached-Session-Policy - from the Access-Accept
                #
                #  The "Cached-Session-Policy" is the name of a  
                #  policy which should be applied to the cached
                #  session.  This policy can be used to assign
                #  VLANs, IP addresses, etc.  It serves as a useful
                #  way to re-apply the policy from the original
                #  Access-Accept to the subsequent Access-Accept
                #  for the cached session.
                #
                #  On session resumption, these attributes are
                #  copied from the cache, and placed into the
                #  reply list.
                #
                #  You probably also want "use_tunneled_reply = yes"  
                #  when using fast session resumption.
                #
                cache {
                        #  Enable it.  The default is "no". Deleting the entire                                                                                                                                                              "cache"  
                        #  subsection also disables caching.
                        #
                        #  As of version 3.0.14, the session cache requires the                                                                                                                                                              use
                        #  of the "name" and "persist_dir" configuration items,                                                                                                                                                              below.  
                        #
                        #  The internal OpenSSL session cache has been permanent                                                                                                                                                             ly
                        #  disabled.
                        #
                        #  You can disallow resumption for a particular user by                                                                                                                                                              adding the
                        #  following attribute to the control item list:
                        #
                        #    Allow-Session-Resumption = No
                        #
                        #  If "enable = no" below, you CANNOT enable resumption                                                                                                                                                              for just one  
                        #  user by setting the above attribute to "yes".  
                        #
                        enable = no

                        #  Lifetime of the cached entries, in hours. The session                                                                                                                                                             s will be
                        #  deleted/invalidated after this time.
                        #
                        lifetime = 24 # hours

                        #  Internal "name" of the session cache. Used to  
                        #  distinguish which TLS context sessions belong to.
                        #
                        #  The server will generate a random value if unset.
                        #  This will change across server restart so you MUST
                        #  set the "name" if you want to persist sessions (see  
                        #  below).
                        #
                #       name = "EAP module"  

                        #  Simple directory-based storage of sessions.
                        #  Two files per session will be written, the SSL
                        #  state and the cached VPs. This will persist session
                        #  across server restarts.
                        #
                        #  The default directory is ${logdir}, for historical
                        #  reasons.  You should ${db_dir} instead.  And check
                        #  the value of db_dir in the main radiusd.conf file.
                        #  It should not point to ${raddb}
                        #
                        #  The server will need write perms, and the directory
                        #  should be secured from anyone else. You might want
                        #  a script to remove old files from here periodically:
                        #
                        #    find ${logdir}/tlscache -mtime +2 -exec rm -f {} \;
                        #
                        #  This feature REQUIRES "name" option be set above.  
                        #
                #       persist_dir = "${logdir}/tlscache"  
                }

                #  As of version 2.1.10, client certificates can be
                #  validated via an external command.  This allows
                #  dynamic CRLs or OCSP to be used.
                #
                #  This configuration is commented out in the
                #  default configuration.  Uncomment it, and configure
                #  the correct paths below to enable it.
                #
                #  If OCSP checking is enabled, and the OCSP checks fail,
                #  the verify section is not run.
                #
                #  If OCSP checking is disabled, the verify section is
                #  run on successful certificate validation.
                #
                verify {
                        #  If the OCSP checks succeed, the verify section
                        #  is run to allow additional checks.
                        #
                        #  If you want to skip verify on OCSP success,
                        #  uncomment this configuration item, and set it
                        #  to "yes".  
                        #
                #       skip_if_ocsp_ok = no

                        #  A temporary directory where the client
                        #  certificates are stored.  This directory
                        #  MUST be owned by the UID of the server,
                        #  and MUST not be accessible by any other
                        #  users.  When the server starts, it will do
                        #  "chmod go-rwx" on the directory, for  
                        #  security reasons.  The directory MUST
                        #  exist when the server starts.
                        #
                        #  You should also delete all of the files
                        #  in the directory when the server starts.
                        #
                #       tmpdir = /tmp/radiusd

                        #  The command used to verify the client cert.
                        #  We recommend using the OpenSSL command-line
                        #  tool.
                        #
                        #  The ${..ca_path} text is a reference to
                        #  the ca_path variable defined above.
                        #
                        #  The %{TLS-Client-Cert-Filename} is the name
                        #  of the temporary file containing the cert
                        #  in PEM format.  This file is automatically
                        #  deleted by the server when the command
                        #  returns.
                        #
                #       client = "/path/to/openssl verify -CApath ${..ca_path} %                                                                                                                                                             {TLS-Client-Cert-Filename}"  
                }

                #  OCSP Configuration
                #
                #  Certificates can be verified against an OCSP
                #  Responder. This makes it possible to immediately
                #  revoke certificates without the distribution of
                #  new Certificate Revocation Lists (CRLs).
                #
                ocsp {
                        #  Enable it.  The default is "no".  
                        #  Deleting the entire "ocsp" subsection  
                        #  also disables ocsp checking
                        #
                        enable = no

                        #  The OCSP Responder URL can be automatically
                        #  extracted from the certificate in question.
                        #  To override the OCSP Responder URL set
                        #  "override_cert_url = yes".  
                        #
                        override_cert_url = yes

                        #  If the OCSP Responder address is not extracted from
                        #  the certificate, the URL can be defined here.
                        #
                        url = "http://127.0.0.1/ocsp/"  

                        # If the OCSP Responder can not cope with nonce
                        # in the request, then it can be disabled here.
                        #
                        # For security reasons, disabling this option
                        # is not recommended as nonce protects against
                        # replay attacks.
                        #
                        # Note that Microsoft AD Certificate Services OCSP
                        # Responder does not enable nonce by default. It is
                        # more secure to enable nonce on the responder than
                        # to disable it in the query here.
                        # See http://technet.microsoft.com/en-us/library/cc77041                                                                                                                                                             3%28WS.10%29.aspx
                        #
                #       use_nonce = yes

                        # Number of seconds before giving up waiting
                        # for OCSP response. 0 uses system default.
                        #
                #       timeout = 0

                        # Normally an error in querying the OCSP
                        # responder (no response from server, server did
                        # not understand the request, etc) will result in
                        # a validation failure.
                        #
                        # To treat these errors as 'soft' failures and  
                        # still accept the certificate, enable this
                        # option.
                        #
                        # Warning: this may enable clients with revoked
                        # certificates to connect if the OCSP responder
                        # is not available. Use with caution.
                        #
                #       softfail = no
                }
        }


        #  EAP-TLS
        #
        #  As of Version 3.0, the TLS configuration for TLS-based
        #  EAP types is above in the "tls-config" section.  
        #
        tls {
                #  Point to the common TLS configuration
                #
                tls = tls-common

                #  As part of checking a client certificate, the EAP-TLS
                #  sets some attributes such as TLS-Client-Cert-Common-Name. Thi                                                                                                                                                             s
                #  virtual server has access to these attributes, and can
                #  be used to accept or reject the request.
                #
        #       virtual_server = check-eap-tls
        }


        #  EAP-TTLS -- Tunneled TLS
        #
        #  The TTLS module implements the EAP-TTLS protocol,
        #  which can be described as EAP inside of Diameter,
        #  inside of TLS, inside of EAP, inside of RADIUS...
        #
        #  Surprisingly, it works quite well.
        #
        ttls {
                #  Which tls-config section the TLS negotiation parameters
                #  are in - see EAP-TLS above for an explanation.
                #
                #  In the case that an old configuration from FreeRADIUS
                #  v2.x is being used, all the options of the tls-config
                #  section may also appear instead in the 'tls' section  
                #  above. If that is done, the tls= option here (and in
                #  tls above) MUST be commented out.
                #
                tls = tls-common

                #  The tunneled EAP session needs a default EAP type
                #  which is separate from the one for the non-tunneled
                #  EAP module.  Inside of the TTLS tunnel, we recommend
                #  using EAP-MD5.  If the request does not contain an
                #  EAP conversation, then this configuration entry is
                #  ignored.
                #
                default_eap_type = md5

                #  The tunneled authentication request does not usually
                #  contain useful attributes like 'Calling-Station-Id',  
                #  etc.  These attributes are outside of the tunnel,
                #  and normally unavailable to the tunneled
                #  authentication request.
                #
                #  By setting this configuration entry to 'yes',  
                #  any attribute which is NOT in the tunneled
                #  authentication request, but which IS available
                #  outside of the tunnel, is copied to the tunneled
                #  request.
                #
                #  allowed values: {no, yes}
                #
                copy_request_to_tunnel = no

                #  As of version 3.0.5, this configuration item
                #  is deprecated.  Instead, you should use
                #
                #    update outer.session-state {
                #      ...
                #    }
                #
                #  This will cache attributes for the final Access-Accept.
                #
                #  The reply attributes sent to the NAS are usually
                #  based on the name of the user 'outside' of the  
                #  tunnel (usually 'anonymous').  If you want to send  
                #  the reply attributes based on the user name inside
                #  of the tunnel, then set this configuration entry to
                #  'yes', and the reply to the NAS will be taken from  
                #  the reply to the tunneled request.
                #
                #  allowed values: {no, yes}
                #
                use_tunneled_reply = no

                #  The inner tunneled request can be sent
                #  through a virtual server constructed
                #  specifically for this purpose.
                #
                #  A virtual server MUST be specified.
                #
                virtual_server = "inner-tunnel"  

                #  This has the same meaning, and overwrites, the
                #  same field in the "tls" configuration, above.  
                #  The default value here is "yes".  
                #
        #       include_length = yes

                #  Unlike EAP-TLS, EAP-TTLS does not require a client
                #  certificate. However, you can require one by setting the
                #  following option. You can also override this option by
                #  setting
                #
                #    EAP-TLS-Require-Client-Cert = Yes
                #
                #  in the control items for a request.
                #
                #  Note that the majority of supplicants do not support using a
                #  client certificate with EAP-TTLS, so this option is unlikely
                #  to be usable for most people.
                #
        #       require_client_cert = yes
        }


        #  EAP-PEAP
        #

        ##################################################
        #
        #  !!!!! WARNINGS for Windows compatibility  !!!!!
        #
        ##################################################
        #
        #  If you see the server send an Access-Challenge,
        #  and the client never sends another Access-Request,
        #  then
        #
        #               STOP!
        #
        #  The server certificate has to have special OID's  
        #  in it, or else the Microsoft clients will silently
        #  fail.  See the "scripts/xpextensions" file for  
        #  details, and the following page:
        #
        #       https://support.microsoft.com/en-us/help/814394/
        #
        #  If is still doesn't work, and you're using Samba,  
        #  you may be encountering a Samba bug.  See:
        #
        #       https://bugzilla.samba.org/show_bug.cgi?id=6563
        #
        #  Note that we do not necessarily agree with their
        #  explanation... but the fix does appear to work.
        #
        ##################################################

        #  The tunneled EAP session needs a default EAP type
        #  which is separate from the one for the non-tunneled
        #  EAP module.  Inside of the TLS/PEAP tunnel, we
        #  recommend using EAP-MS-CHAPv2.
        #
        peap {
                #  Which tls-config section the TLS negotiation parameters
                #  are in - see EAP-TLS above for an explanation.
                #
                #  In the case that an old configuration from FreeRADIUS
                #  v2.x is being used, all the options of the tls-config
                #  section may also appear instead in the 'tls' section  
                #  above. If that is done, the tls= option here (and in
                #  tls above) MUST be commented out.
                #
                tls = tls-common

                #  The tunneled EAP session needs a default
                #  EAP type which is separate from the one for
                #  the non-tunneled EAP module.  Inside of the
                #  PEAP tunnel, we recommend using MS-CHAPv2,
                #  as that is the default type supported by
                #  Windows clients.
                #
                default_eap_type = mschapv2

                #  The PEAP module also has these configuration
                #  items, which are the same as for TTLS.
                #
                copy_request_to_tunnel = no

                #  As of version 3.0.5, this configuration item
                #  is deprecated.  Instead, you should use
                #
                #    update outer.session-state {
                #      ...
                #    }
                #
                #  This will cache attributes for the final Access-Accept.
                #
                use_tunneled_reply = no

                #  When the tunneled session is proxied, the
                #  home server may not understand EAP-MSCHAP-V2.
                #  Set this entry to "no" to proxy the tunneled  
                #  EAP-MSCHAP-V2 as normal MSCHAPv2.
                #
        #       proxy_tunneled_request_as_eap = yes

                #  The inner tunneled request can be sent
                #  through a virtual server constructed
                #  specifically for this purpose.
                #
                #  A virtual server MUST be specified.
                #
                virtual_server = "inner-tunnel"  

                #  This option enables support for MS-SoH
                #  see doc/SoH.txt for more info.
                #  It is disabled by default.
                #
        #       soh = yes

                #  The SoH reply will be turned into a request which
                #  can be sent to a specific virtual server:
                #
        #       soh_virtual_server = "soh-server"  

                #  Unlike EAP-TLS, PEAP does not require a client certificate.
                #  However, you can require one by setting the following
                #  option. You can also override this option by setting
                #
                #    EAP-TLS-Require-Client-Cert = Yes
                #
                #  in the control items for a request.
                #
                #  Note that the majority of supplicants do not support using a
                #  client certificate with PEAP, so this option is unlikely to
                #  be usable for most people.
                #
        #       require_client_cert = yes
        }


        #  EAP-MSCHAPv2
        #
        #  Note that it is the EAP MS-CHAPv2 sub-module, not
        #  the main 'mschap' module.  
        #
        #  Note also that in order for this sub-module to work,
        #  the main 'mschap' module MUST ALSO be configured.  
        #
        #  This module is the *Microsoft* implementation of MS-CHAPv2
        #  in EAP.  There is another (incompatible) implementation
        #  of MS-CHAPv2 in EAP by Cisco, which FreeRADIUS does not
        #  currently support.
        #
        mschapv2 {
                #  Prior to version 2.1.11, the module never
                #  sent the MS-CHAP-Error message to the
                #  client.  This worked, but it had issues
                #  when the cached password was wrong.  The
                #  server *should* send "E=691 R=0" to the  
                #  client, which tells it to prompt the user
                #  for a new password.
                #
                #  The default is to behave as in 2.1.10 and
                #  earlier, which is known to work.  If you
                #  set "send_error = yes", then the error  
                #  message will be sent back to the client.
                #  This *may* help some clients work better,
                #  but *may* also cause other clients to stop
                #  working.
                #
        #       send_error = no

                #  Server identifier to send back in the challenge.
                #  This should generally be the host name of the
                #  RADIUS server.  Or, some information to uniquely
                #  identify it.
                #
        #       identity = "FreeRADIUS"  
        }


        #  EAP-FAST
        #
        #  The FAST module implements the EAP-FAST protocol
        #
        #fast {
                #  Point to the common TLS configuration
                #
        #       tls = tls-common

                #  If 'cipher_list' is set here, it will over-ride the  
                #  'cipher_list' configuration from the 'tls-common'  
                #  configuration.  The EAP-FAST module has it's own  
                #  over-ride for 'cipher_list' because the  
                #  specifications mandata a different set of ciphers
                #  than are used by the other EAP methods.
                #
                #  cipher_list though must include "ADH" for anonymous provision                                                                                                                                                             ing.  
                #  This is not as straight forward as appending "ADH" alongside  
                #  "DEFAULT" as "DEFAULT" contains "!aNULL" so instead it is  
                #  recommended "ALL:!EXPORT:!eNULL:!SSLv2" is used  
                #
                #  Note - for OpenSSL 1.1.0 and above you may need
                #  to add ":@SECLEVEL=0"  
                #
        #       cipher_list = "ALL:!EXPORT:!eNULL:!SSLv2"  

                #  PAC lifetime in seconds (default: seven days)
                #
        #       pac_lifetime = 604800

                #  Authority ID of the server
                #
                #  If you are running a cluster of RADIUS servers, you should ma                                                                                                                                                             ke
                #  the value chosen here (and for "pac_opaque_key") the same on                                                                                                                                                              all  
                #  your RADIUS servers.  This value should be unique to your
                #  installation.  We suggest using a domain name.
                #
        #       authority_identity = "1234"  

                #  PAC Opaque encryption key (must be exactly 32 bytes in size)
                #
                #  This value MUST be secret, and MUST be generated using
                #  a secure method, such as via 'openssl rand -hex 32'  
                #
        #       pac_opaque_key = "0123456789abcdef0123456789ABCDEF"  

                #  Same as for TTLS, PEAP, etc.
                #
        #       virtual_server = inner-tunnel
        #}
}
aqui
aqui 22.10.2019 um 19:04:11 Uhr
Goto Top
Wer soll das bitte lesen face-sad
Bitte dringenst Code Tags verwenden !!!
Formatierungen in den Beiträgen
Jannik2018
Jannik2018 22.10.2019 um 19:13:39 Uhr
Goto Top
hab screens gemacht damit es einfacher ist
aqui
aqui 24.10.2019 aktualisiert um 11:02:30 Uhr
Goto Top
BITTE setze ZUSÄTZLICH den obigen Text DRINGENST auch in Code Tags !!!!
Mehr als 3mal sagen plus PM kann man das ja nicht. face-sad
Du kannst das doch selber sehen im Browser das kein Mensch das lesen kann von der unnötigen Platzverschwendung hier mal gar nicht zu reden. Das muss doch nicht sein...
So kannst du diese Gruselformatierung hier im Forum nicht lassen !
Nebenbei sind dein 3 quasi leeren Screenshots doch Schwachsinn. Sorry aber das steht doch gar nichts drin. Was bringt das also ??
Räume also DRINGENST dein Posting hier mal auf damit wir hier strukturiert weitermachen können. So ist das unmöglich...
Formatierungen in den Beiträgen
Jannik2018
Jannik2018 24.10.2019 aktualisiert um 12:59:11 Uhr
Goto Top
code tags wurden gesetzt
aqui
aqui 24.10.2019 um 13:51:56 Uhr
Goto Top
Röchel... face-smile
Aber wie du ja selber sehen kannst sind die Konfig Einstellungen völlig identisch...mmmhhh.
Was ist das für ein AP Modell ?
Jannik2018
Jannik2018 24.10.2019 aktualisiert um 22:23:16 Uhr
Goto Top
Tplink 300M Wireless N Acces Point
also mit Meinem Samsung handy klappt der auth per Win 7 client nicht
aqui
aqui 25.10.2019 aktualisiert um 10:22:42 Uhr
Goto Top
mit Meinem Samsung handy klappt der auth per Win 7 client nicht
Bahnhof, Ägypten ???
Wie meinst du das ?? Du kannst doch nur entweder mit dem Samsung Client oder dem Win 7 Client testen ?!
Beides sind 2 komplett getrennte Geräte die ganz eigene Authentisierungen machen. Das eine hat gar nix mit dem anderen zu tun, der eine macht seine Authentsierung und der andere macht seine. Niemals macht ein Smartphone Client eine Auth "über" einen Rechner Client oder vice versa. Ginge technisch ja auch gar nicht.
Oder wie meinst du den obigen verschwurbelten Satz genau ??
Einen "Tplink 300M" kennt das gesamte Produkt Portfolio von TP-Link übrigens nirgendwo ! Bist du sicher das das, das richtige Modell ist ??
Jannik2018
Jannik2018 25.10.2019 um 18:57:07 Uhr
Goto Top
du hats mich Falsch verstanden ich meinte
das wenn ich mich über mein Samsung am AP authentifizieren möchte funktioniert die authentifizierung
teste ich es mit einem WIn 7 Client wird die Auth Anfrage rejekted
aqui
aqui 25.10.2019 aktualisiert um 20:44:24 Uhr
Goto Top
Poste mal deine User.conf settings !
Ich habe hier im Test setup gesehen das bei Mac Authentisierung die Mac Adressen case sensitive sind. (Groß- Kleinschreibung) Damit bekam ich die gleiche PAP Fehlermeldung wie du.
Wenn du Mac Auth machst ist das möglich das es daran liegt.
002185dab65c    Cleartext-Password := "002185dab65c"
#               Tunnel-Type = 13,
#               Tunnel-Medium-Type = 6,
#               Tunnel-Private-Group-Id = 10
#
vlan10          Cleartext-Password := "vlan10"
#                   Tunnel-Type = 13,
#                   Tunnel-Medium-Type = 6,
#                   Tunnel-Private-Group-Id = 10
# 
#       Notebook Wifi
0027857E8250    Cleartext-Password := "0027857E8250"
#
0023FA7BD9A6  Cleartext-Password := "0023FA7BD9A6"
   User-Name = user1,
   Tunnel-Type = VLAN,
   Tunnel-Medium-Type = IEEE-802,
   Tunnel-Private-Group-ID = 0010
# 
Mit den 2 unteren Einträgen scheiterte die Auth (PAP Error), weil diese Großbuchstaben in der Mac verwendeten.
Jannik2018
Jannik2018 25.10.2019 um 20:42:56 Uhr
Goto Top
ich mache ja kein Mac Auth ich will ja user Pass auth
aqui
aqui 25.10.2019 aktualisiert um 20:44:58 Uhr
Goto Top
Sieht deine Konfig so aus wie oben (vlan10 Beispiel) ?
Jannik2018
Jannik2018 25.10.2019 aktualisiert um 22:36:57 Uhr
Goto Top
Meine User Config testen mache ich mit bob also JA
users.cong_raius
aqui
aqui 26.10.2019 aktualisiert um 12:21:29 Uhr
Goto Top
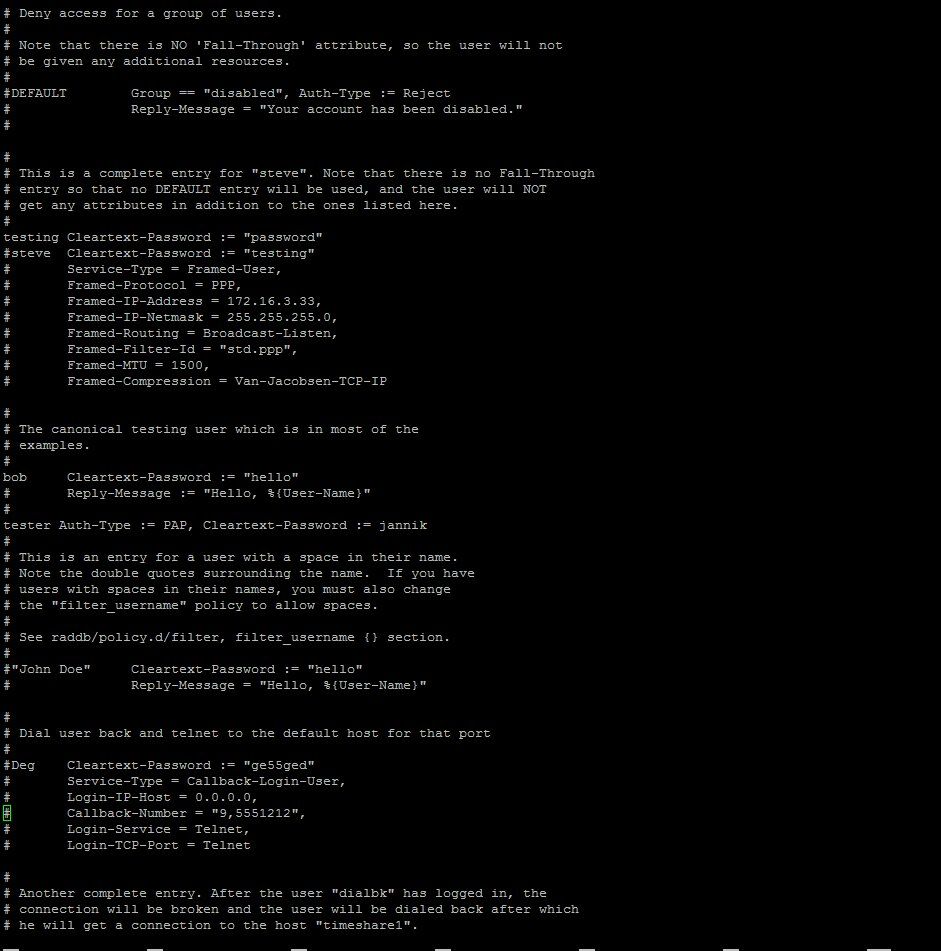
Deine Error Meldung kommt vom User tester mit dem Auth Type PAP !!
Den solltest du besser erstmal komplett mit "#" auskommentieren !!

Tip:
Nutze nicht die Default User Datei authorize !
Kommentiere dort alles was an Testusern da ist aus. Einzig solltest du die drei DEFAULT Settings unten für PPP, SLIP und CSLIP lassen. Alles andere auskommentieren.
Unter dem Header Text der Datei fügst du dann direkt als ersten Befehl ein: $INCLUDE users.test
Dann erzeugst du dir eine separate Datei mit:
  • touch users.test
  • Änderst mit chown freerad:freerad users.test den Owner
  • und setzt mit chmod 640 users.test die Rechte
So sieht das dann aus in dem Verzeichnis:
root@raspi:/etc/freeradius/3.0/mods-config/files# ls -la
total 28
drwxr-xr-x 2 freerad freerad 4096 Oct 26 12:10 .
drwxr-xr-x 9 freerad freerad 4096 Apr 19  2019 ..
-rw-r----- 1 freerad freerad  717 Aug 10  2017 accounting
-rw-r----- 1 freerad freerad 7150 Oct 26 12:10 authorize
-rw-r----- 1 freerad freerad 1030 Aug 10  2017 pre-proxy
-rw-r----- 1 freerad freerad 3171 Oct 25 18:40 users.test 
Damit hast du dann eine eigene kleine Users Datei ohne das du immer in der User Beispieldatei fummeln musst. face-wink
Ist zum Testen und Troubleshooten einfacher zu handhaben.
Jannik2018
Jannik2018 26.10.2019 um 18:54:06 Uhr
Goto Top
hab ich nun allerdings funktioniert die Anmeldung via win 7 Client am AP immernoch nicht
aqui
aqui 26.10.2019 um 20:24:23 Uhr
Goto Top
Ich habs jetzt mal mit Mikrotik, Cisco, Ruckus probiert rennt fehlerlos am Switch, Accesspoint usw.:
WLAN: VLAN-Zuordnung anhand Radius-Eigenschaften? MikroTik CAPsMAN
Jannik2018
Jannik2018 26.10.2019 um 20:45:21 Uhr
Goto Top
inwiefern hilft mir dass ??
aqui
aqui 27.10.2019 um 10:40:09 Uhr
Goto Top
Nur mal als Beispiel wie es auf dem FreeRadius aussieht....
Jannik2018
Jannik2018 27.10.2019, aktualisiert am 30.11.2019 um 20:21:50 Uhr
Goto Top
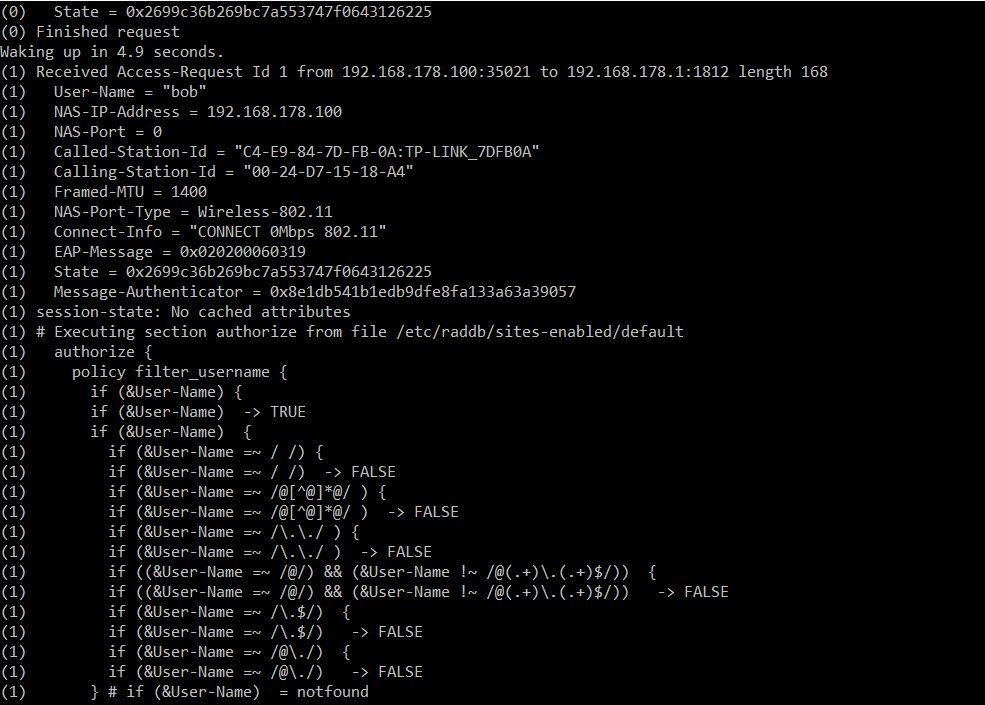
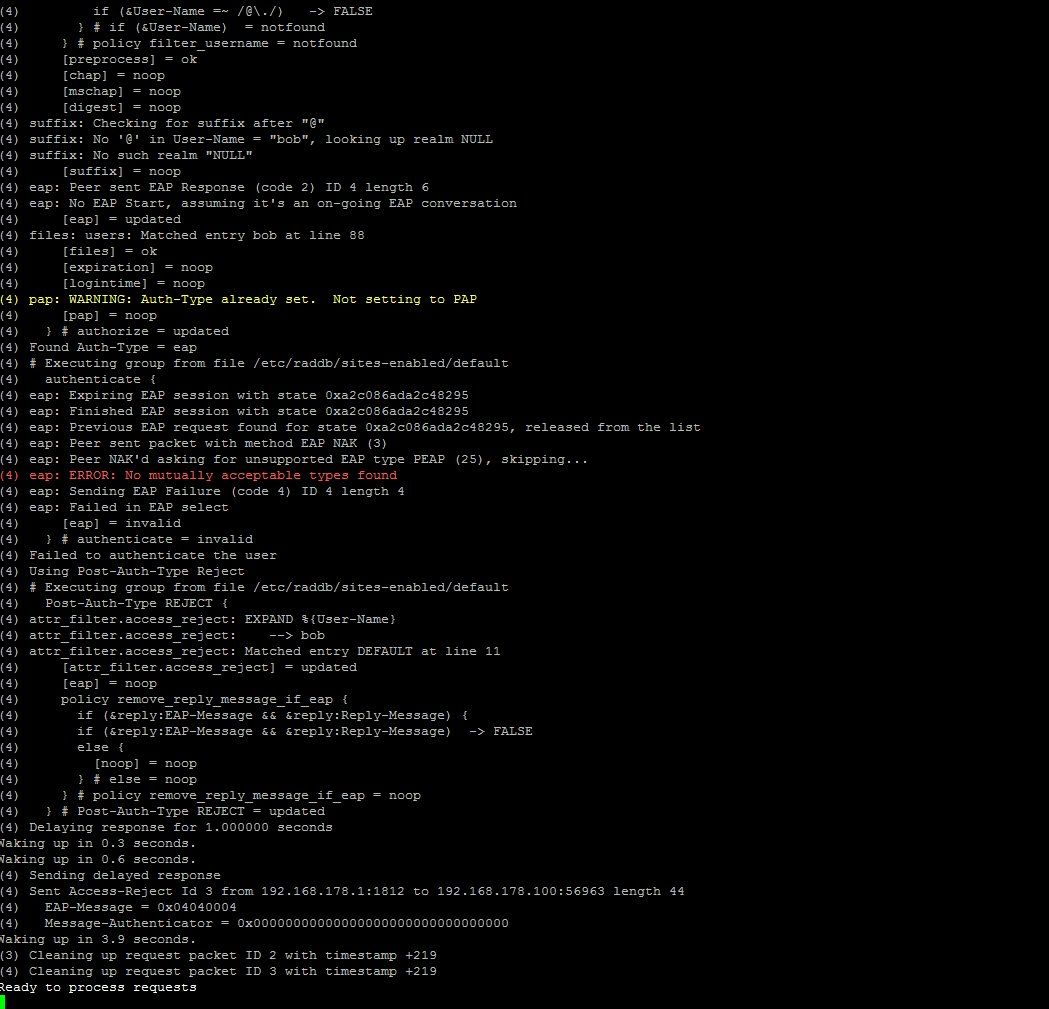
achso und wie bekomm ich mein win 7 jetzt verbunden auf dem Screen hab ich mal den error gepostet wenn ich mich versuche mit win 7 zu verbinden
rejekt_win7