Cisco WLAN Access Points for Home Use: 1142N, 2702, 3702 and 3800 Comparison
Table of contents
Renewals of commercial WiFi enterprise networks cause of new standards and hence new required hardware (additional 6 GHz band etc.) result in the fact that a lot of professional and premium APs can be found for bargain prices at resellers or on auction platforms like eBay and Co.
These AP models are made for the enterprise market which can be seen from a manufacturing perspective with heavy metal cases, low loss antennas on ceramic based pcb's etc. A huge difference in comparison to cheap, mass production consumer equipment in thin plastic housings.
Their WiFi technique is based on the 802.11n (max. 600 Mbit/s with WiFi 4) standard and still widely in use. A dual radio AP with a simultaneous support of both 2,4 GHz and 5 GHz bands, MSSID/VLAN function, fast 802.11r roaming, band steering to preferr the less congested 5 GHz WiFi band as well as MIMO 2x3 is still a good choice for small WiFi infrastructures for a cheap price.
A configuration webGUI, guestnet segmentation and on top a radius server are completing the rich feature set which can not be seen on typical mass production APs. They still provide a good performance and a reliable WiFi network for small SoHo environments with very little budgets like schools, cafes and smaller hotels etc.
The following HowTo is also valid for the Cisco ap models 1700/2700/2600/3600/3700, cause all these models use the same firmware image called "ap3g2-xxx".
The upgrade procedure of Cisco Mobility Express AP models (modelnummer x8xx), who provide an onboard WLAN controller for central management, is described in a separate thread.
Cisco has designed the LAP1142N the CAP2602I and the above mentioned ap model accesspoints to work primarily with a central WLAN controller (e.g. Cisco AIR-CT2504-5-K9). Therefore most of them come with a so called "lightweight" firmware image working in "lightweight mode" and which did not allow any standalone operation. Standalone is more or less the typical operation mode in smaller SoHo networks.
But Cisco always offer a firmware image for standalone operation too. So these APs simply need do be flashed with a new firmware image to bring them into standalone mode to get rid of a mandatory controller.
After the firmware change the APs can be configured with a classical web GUI and be used like classical, of the shelf, APs without any controller. For Cisco trained network admins they provide the classical well known Cisco CLI as well. Either on a serial port or via telnet / SSH.
The following tutorial describes the easy and simple flashing process to change the APs firmware into standalone mode.
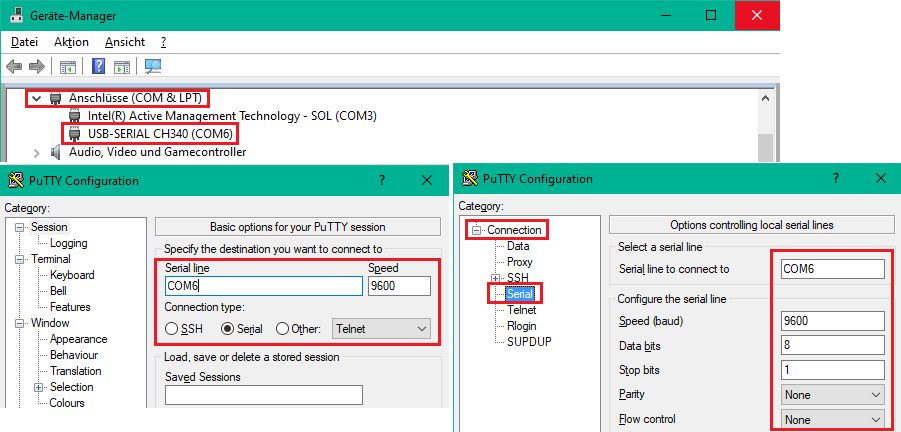
What is needed is a TFTP server which provides the firmware image for TFTP download in the network. Helpful is also a USB-serial adaptor to monitor the Cisco serial CLI console port (9600 baud N81). These adaptors can easily be found online or at local pc shops like HERE.
Most network components have serial interfaces as well and require those adapters for initial setup. So its a good investment in this tool.
The terminal program used here under Windows is the all time classic PuTTY or as an alternative TeraTerm. MacOS users have ZOC and under Linux its the well known minicom.
Serial interface settings
- 9600 baud
- 8 bits, no parity, 1 stopbit
- No hardware or software flow control
After booting into the flashing mode the AP automatically gets a default IP addresse of 10.0.0.1 /8 and is automatically looking for a TFTP server in the connected network by broadcast. If the TFTP server is present he starts booting a default firmware image named c1140-k9w7-tar.default (1142N) or ap3g2-k9w7-tar.default (2602I).
After flashing this default image the AP reboots into standalone mode and is ready to use.
The AP then looks via DHCP for a management IP address like a standard AP. If provided successfully he can easily be managed over this IP Adresse with a standard HTML browser GUI or via telnet / ssh terminal.
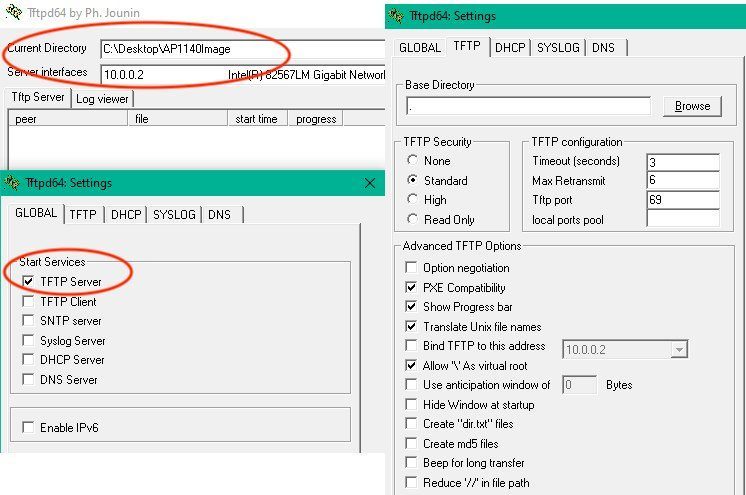
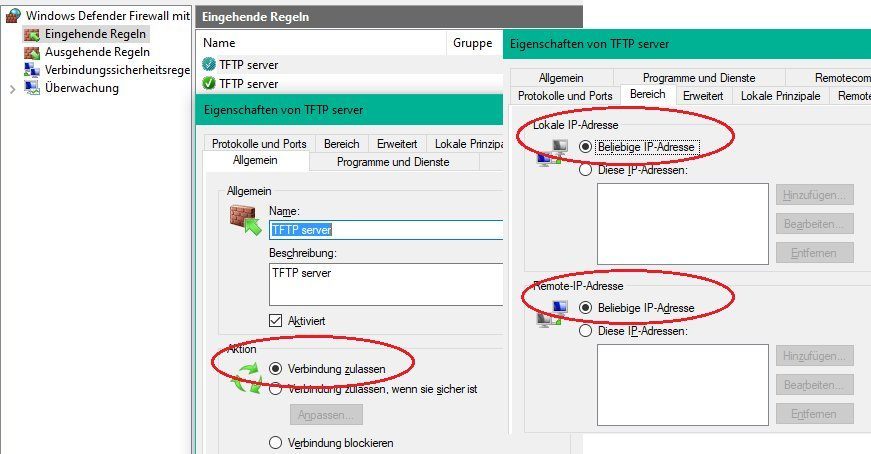
This example uses the well known TFTP server TFTP32_or_TFTP64 or Pumpkin as an alternative. Apple MacOS users can use a TFTP Server and Linux users the onboard provided TFTP server tftpd-hpa.
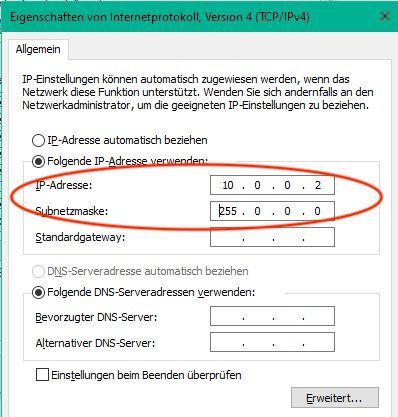
The PC which provides the TFTP server has to be set manually into the same IP network with his address as the default IP address of the AP. The following example shows this with a Windows PC (here 10.0.02).
Important is here to set the TFTP root directory "Current Directory" to the same directory which contains the firmware image files c1140-k9w7-tar.default (1142N) or ap3g2-k9w7-tar.default (2602I).
Putting the original file names like "c1140-k9w7-tar.153-3.JD16.tar" or "c1140-k9w7-tar.153- 3.JD17.tar" as well as ap3g2-k9w7-tar.153-3 for the 2602I model into a search engine will show a download option. These original names have to be renamed into:
- c1140-k9w7-tar.default for Cisco LAP1142N
- ap3g2-k9w7-tar.default for Cisco CAP2602I
Images can be downloaded free HERE with a free guest account on the Cisco CCO (All Images prior to Release 15.3.3-JH ED (Early Deployment (ED) are free downloadable). Renamed images HERE.
Primarily these access points usually work with PoE (power via network cable) following the 802.3af or 802.3at standard. This is also valid for the 1142N and 2602I APs. Both APs are additionally equipped with an external power connector for an external power supply. (+ on the middle pin).
Hence the AP can also be easily operated in environments without PoE switches. Simple and standard 48 volt power supplies can be used here or, as a much better alternative, a cheap, standard PoE_Injector.
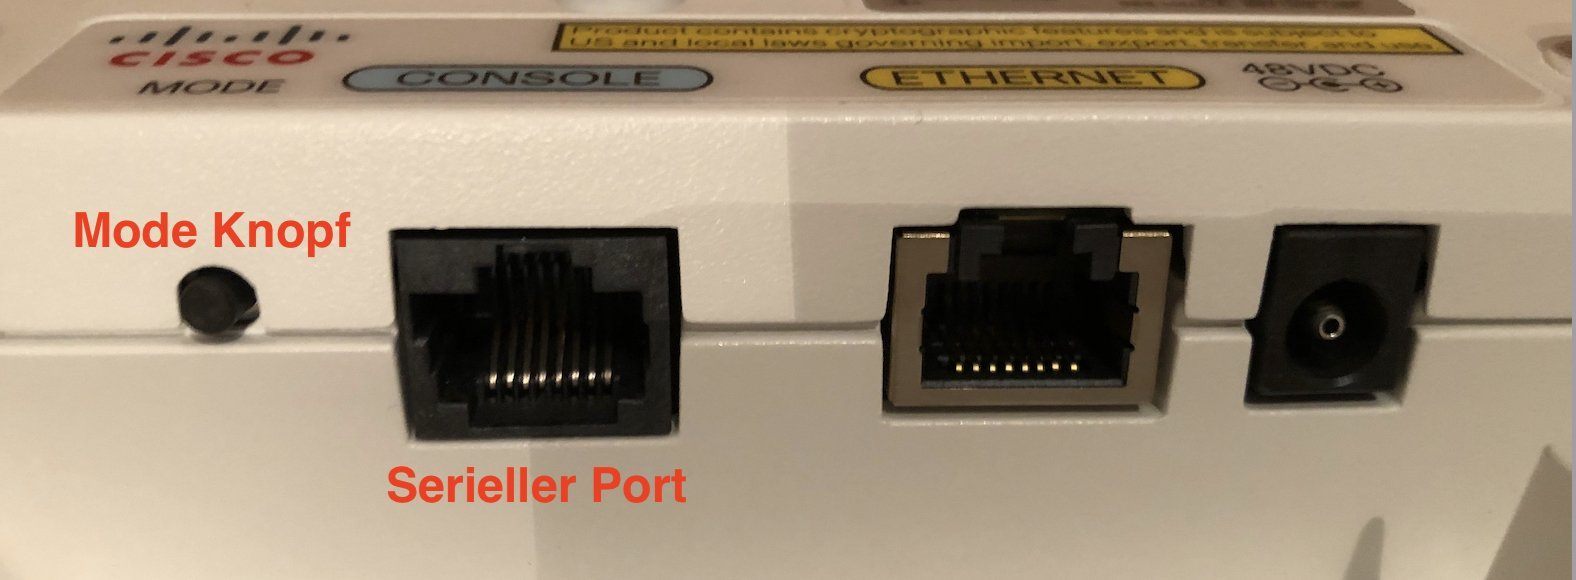
Instructions for booting the AP into flash mode:
For automatic booting and flashing the firmware image keep the Mode button pressed BEFORE connecting either the power supply or PoE !! So first keep the button pressed and then connect power and hold the button pressed.
Still keep the Mode button pressed until the status LED on the AP front changes the color from blue flashing to red. After that change release the button. This lasts almost around 20 seconds.
The AP then contacts automatically the running TFTP server in the network and installs the image. The whole flashing process lasts around 3-4 minutes and should NOT be interrupted !
The flashing process can also be observed with the increasing timebar on the tftp server or as well with the terminal messages on the APs serial console if connected to a terminal.

...
IOS Bootloader - Starting system.
Xmodem file system is available.
DDR values used from system serial eeprom.
Reading cookie from system serial eeprom...Done
Base Ethernet MAC address: f8:66:f2:44:5a:e4
Ethernet speed is 1000 Mb - FULL duplex
button is pressed, wait for button to be released...
button pressed for 27 seconds
process_config_recovery: set IP address and config to default 10.0.0.1
process_config_recovery: image recovery
image_recovery: Download default IOS tar image tftp:/ /255.255.255.255/c1140-k9w7-tar.default
examining image...
extracting info (283 bytes)
Image info: ...
In some cases its possible that the console shows the following error after the boot- and flashing process:
Not enough free space to download image first w/o extracting
deleting existing version(s)...
Deleting current version: flash:/ap3g2-k9w8-mx.153-x.JXy...done.
This shows that there is not enough space in the flash rom anymore and that the system has automatically erased the old image.
This is NOT a problem and a following second attempt will finish the flashing process without any errors.
Used APs may have a backup config file in the flash named config.txt.bak. The AP automatically creates a backup after a write mem to prevent users from completely erasing their config. This backup file is NOT erased after a write erase oder erase startup due to security.
If there is no actual config (config.txt) in the flash but still a backup the AP will always boot the backup. To get a "clean" AP ist necessary to erase the backup manually.
This is done with del flash:config.txt.bak and a reboot will end up in a "clean" AP. 😉
ap#sh flash:
Directory of flash:/

    2  -rwx        3249  Nov 20 2023 17:38:10 +01:00  config.txt
    3  -rwx        7273   Apr 3 2023 10:20:22 +02:00  event.log
  246  drwx        2496   Jan 1 1970 01:16:58 +01:00  ap3g2-k9w7-mx.153-3.JPO
    5  -rwx         196   Apr 3 2023 10:20:30 +02:00  env_vars
6 -rwx 3249 Nov 20 2023 17:38:10 +01:00 config.txt.bak <<==ERASE! The setup as a standard AP after rebooting the new image can be quickly done via the GUI:
- Default Passwort: "Cisco" (capital "C" !)
- Setup SSID and if in MSSID mode map to a certain VLAN ID
- WPA-2 passwort setting
- Attention: Universal Admin Mode has to be deactivated !
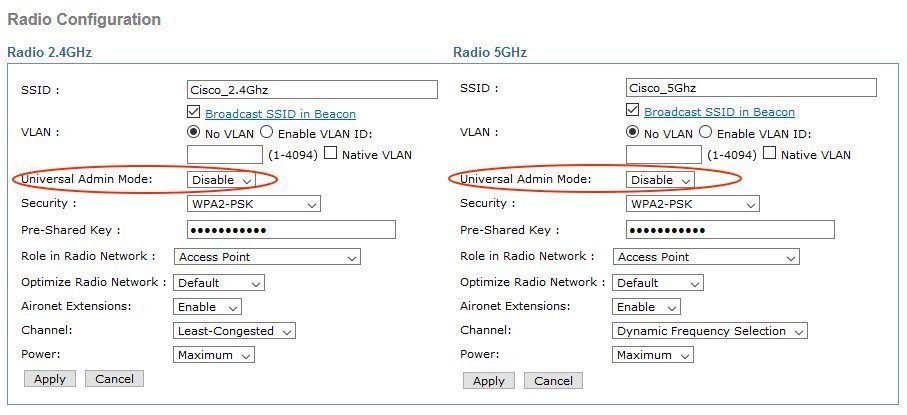
Or ready to use example configurations HERE.
Generally there are no obstacles for popular SSH terminal programs under Windows like PuTTY or TeraTerm to access Cisco devices. Linux can be sometimes tricky cause of very strong key exchange algorithms in OpenSSH which often do not support diffie-hellman-group14-sha1 used in Cisco and other vendors devices.
To get rid of this OpenSSH needs a little customization.
In case acces is denied due to non supported kex algorithm the ssh command can be extended like this
ssh -oKexAlgorithms=+diffie-hellman-group14-sha1 admin@<ip_address>
Or, to make it permantly a simple text file called "config" can be placed under /home/user/.ssh/ with the following content:
Host 172.30.0.102
KexAlgorithms +diffie-hellman-group14-sha1 Same kex error can occur when trying to SSH access a Linux server from a Cisco device. In this case just add a config text file in the /etc/ssh/sshd_config.d directory like cisco.conf with teh following content:
KexAlgorithms +diffie-hellman-group14-sha1Can be found HERE!
The wall mounting plate can be found und the search pattern Cisco 69-2160-03 Access Point Mounting Bracket. eBay and Co. show them sometimes in connection with the APs.
Tutorial in 🇩🇪:
Cisco WLAN Access Points 3800, 3702, 2702 für den Heimgebrauch umrüsten
Cisco datasheet for 1140er und 2602I APs:
cisco.com/c/dam/global/de_de/assets/portal-content/produkte-loes ...
cisco.com/c/de_de/support/wireless/aironet-2600i-access-point/mo ...
Cisco configuration guide for autonomous APs:
cisco.com/c/en/us/td/docs/wireless/access_point/atnms-ap-8x/conf ...
Cisco Mobility Express models (x8xx) upgrade from Lightweight:
Gebrauchten Cisco 1852 mit Mobility Express zum laufen bekommen
Avoid beginner problems with a MSSID setup (multiple WLANs over one single AP):
Standalone-Einrichtung Cisco Air LAP 1142N
MSSID/VLAN tutorial:
VLAN Installation und Routing mit pfSense, Mikrotik, DD-WRT oder Cisco RV Routern
Real life setup: Guest WiFi with Cisco AP:
VLAN Installation und Routing mit pfSense, Mikrotik, DD-WRT oder Cisco RV Routern
Connect 2 IP networks over WiFi with Cisco APs:
2 Cisco AIR-LAP1142N-E-K9 als Bridge verbinden
Managing WLANs with a webGUI based Radius authentication:
Freeradius Management mit WebGUI
Cisco AP based WLAN using Mikrotik Radius server:
Cisco AP using Mikrotik Radius server
WLAN with dynamic VLAN association:
Dynamische VLAN Zuweisung für WLAN (u. LAN) Clients mit Mikrotik
Internet related link to this topic:
exchange2013pikasuoh.blogspot.com/2015/08/convert-cisco-air-lap1 ...
Bitte markiere auch die Kommentare, die zur Lösung des Beitrags beigetragen haben
Content-ID: 901293552
Url: https://administrator.de/tutorial/cisco-wlan-access-points-for-home-use-1142n-2702-3702-and-3800-comparison-901293552.html
Ausgedruckt am: 12.07.2025 um 01:07 Uhr
Serie: Cisco-Tutorials
Cisco router with zone based firewall and port forwarding (englisch)Cisco IPsec VPN with Mikrotik or FritzBox (englisch)Cisco WLAN Access Points for Home Use: 1142N, 2702, 3702 and 3800 Comparison (englisch)Cisco, Mikrotik, pfSense site-to-site VPN with dynamic routing (englisch)1Cisco WLAN Access Points 3800, 3702, 2702 für den Heimgebrauch umrüsten124Cisco Telefon für All IP Anschluss, FritzBox und andere VoIP Anlagen fit machen183Cisco 800, 900, ISR1100 Router Konfiguration mit xDSL, Kabel, FTTH Anschluss und VPN285